> ## Documentation Index
> Fetch the complete documentation index at: https://developers.kajabi.com/llms.txt
> Use this file to discover all available pages before exploring further.
# Add a DMARC record to DNS
> Configure a DMARC record in DNS to increase email deliverability and security.
A **DMARC** (Domain-based Message Authentication, Reporting, and Conformance) record helps prevent email spoofing and improves deliverability. Adding this record to DNS ensures your emails are authenticated and trusted by recipient mail servers.
## Before you begin
Before adding a DMARC record, confirm who actually controls your domain's DNS.
1. From the Dashboard, click **Settings**.
2. Under **Site settings**, click **Domain**.
3. Check whether **DNS Settings** appears for your domain.
**Warning:** If **DNS Settings** appears, your domain is connected using the nameserver method, and Kajabi's nameservers already control your DNS zone. Do not change your DNS type or nameservers at your registrar to unlock a record editor there. Switching away from Kajabi's nameservers can take down your live site, and any other service, such as email, that depends on the same DNS zone. Add the DMARC record inside Kajabi instead. See [Kajabi](#kajabi) below.
If **DNS Settings** does not appear, your domain was connected using the CNAME/subdomain method, and DNS is still managed by your registrar. Follow the instructions for your DNS provider below instead.
## General instructions
The process of adding a DMARC record varies depending on your DNS provider, but the general setup is the same. For a specific DNS provider, please find your DNS provider in the next section.
Add the following record to your DNS settings:
| Field | Value |
| - | - |
| **Type** | TXT |
| **Name** | `_dmarc.kjbm` |
| **Content (or Value)** | `"v=DMARC1; p=none; pct=100; fo=1; ri=3600; rua=mailto:ce4b0f5c@dmarc.mailgun.org,mailto:1be13cfa@inbox.ondmarc.com; ruf=mailto:ce4b0f5c@dmarc.mailgun.org,mailto:1be13cfa@inbox.ondmarc.com"` |
**Important:** Be sure to include all special characters, including quotation marks, apostrophes, and spaces. Copying and pasting the full value exactly as shown is recommended.
## Kajabi
If **DNS Settings** appears for your domain, add the DMARC record there instead of at your registrar:
1. From the Dashboard, open the **Settings** tab.
2. Under **Site settings**, click **Domain**, then **DNS Settings**.
3. Click **+ Custom Record** in the top right corner of the DNS Settings page.
4. Select **TXT record** as the record type.
5. Enter the **Name** and **Content** values from the table in General instructions above.
6. Save your changes.
**Note:** Changes to DNS records can take up to 24-48 hours to go into full effect.
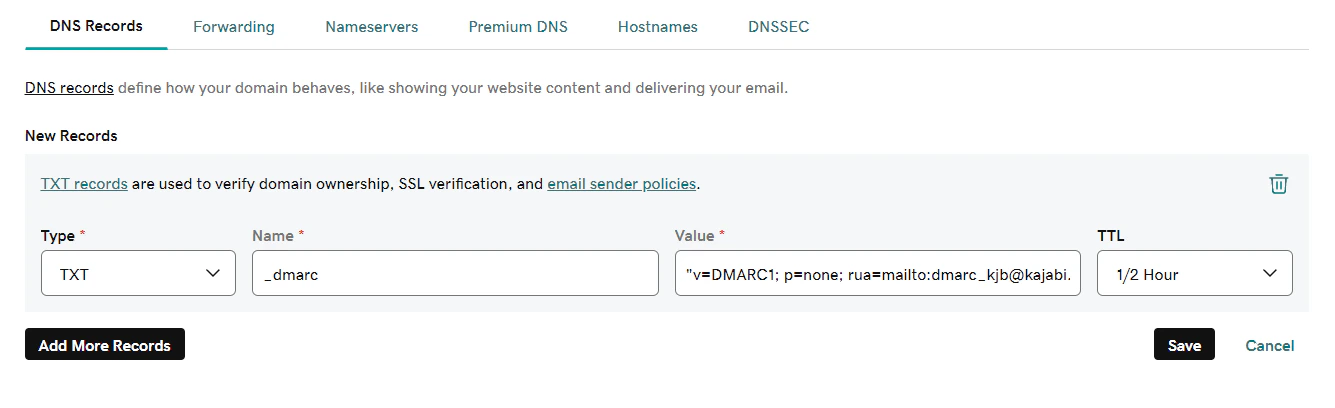
## GoDaddy
To add a DMARC record in GoDaddy:
1. In your GoDaddy DNS Records, click **Add** and select **TXT** from the Type dropdown.
2. Enter `_dmarc.kjbm` into the **Name** field.
3. Paste the full value into the **Value** field.
4. Keep the default **TTL**.
5. Click **Add record**.
 ## Cloudflare
To add a DMARC record in Cloudflare:
1. Log into your Cloudflare dashboard and select your active domain.
2. Go to the **DNS** tab.
3. Click **+ Add Record** and select **TXT** as the type.
4. Enter `_dmarc.kjbm` into the **Name** field.
5. Paste the full value into the **Content** field.
6. Keep the default **TTL**.
7. Click **Save**.
## Bluehost
To add a DMARC record in Bluehost:
1. In your Bluehost **DNS Manager**, scroll to the **TXT** section and click **Add Record**.
2. Enter `_dmarc.kjbm` into the **Name** field.
3. Paste the full value into the **TXT Value** field.
4. Select **4 Hours** in the **TTL** field.
5. Click **Save**.
## Namecheap
To add a DMARC record in Namecheap:
1. In your Namecheap **Advanced DNS** settings, locate your **Host Records**.
2. Click **+ Add New Record** and select **TXT Record** from the dropdown.
3. Enter `_dmarc.kjbm` into the **Host** field.
4. Paste the full value into the **Value** field.
5. Keep the **TTL** set to **Automatic**.
6. Click **Save All Changes**.
## SiteGround
To add a DMARC record in SiteGround:
1. In your SiteGround Site Tools, navigate to **Domain** > **DNS Zone Editor**.
2. Click **Create New Record** and select **TXT** as the type.
3. Enter `_dmarc.kjbm` into the **Name** field.
4. Paste the full value into the **Value** field.
5. Click **Create**.
## Cloudflare
To add a DMARC record in Cloudflare:
1. Log into your Cloudflare dashboard and select your active domain.
2. Go to the **DNS** tab.
3. Click **+ Add Record** and select **TXT** as the type.
4. Enter `_dmarc.kjbm` into the **Name** field.
5. Paste the full value into the **Content** field.
6. Keep the default **TTL**.
7. Click **Save**.
## Bluehost
To add a DMARC record in Bluehost:
1. In your Bluehost **DNS Manager**, scroll to the **TXT** section and click **Add Record**.
2. Enter `_dmarc.kjbm` into the **Name** field.
3. Paste the full value into the **TXT Value** field.
4. Select **4 Hours** in the **TTL** field.
5. Click **Save**.
## Namecheap
To add a DMARC record in Namecheap:
1. In your Namecheap **Advanced DNS** settings, locate your **Host Records**.
2. Click **+ Add New Record** and select **TXT Record** from the dropdown.
3. Enter `_dmarc.kjbm` into the **Host** field.
4. Paste the full value into the **Value** field.
5. Keep the **TTL** set to **Automatic**.
6. Click **Save All Changes**.
## SiteGround
To add a DMARC record in SiteGround:
1. In your SiteGround Site Tools, navigate to **Domain** > **DNS Zone Editor**.
2. Click **Create New Record** and select **TXT** as the type.
3. Enter `_dmarc.kjbm` into the **Name** field.
4. Paste the full value into the **Value** field.
5. Click **Create**.