> ## Documentation Index
> Fetch the complete documentation index at: https://developers.kajabi.com/llms.txt
> Use this file to discover all available pages before exploring further.
# Automations overview
> Add Automations from Funnels, Forms, Offers, and Courses, and find out whether your account uses the original or upgraded experience.
**Automations** on Kajabi use **When**, **Then**, and **Only if** logic to help you streamline processes and automate basic admin actions.
Your Kajabi plan determines which you get: the Basic Plan includes Basic Automations, and Growth and Pro Plans include Advanced Automations.
[Learn more about the difference between Basic Automations and Advanced Automations](/articles/marketing/automations/basic-vs-advanced-automations)
**Note:** Growth and Pro Plans have access to create any Automation within the **Marketing** tab. Basic Plans only have access to create Automations in various other areas of Kajabi.
## Which Automations experience you have
Kajabi has two versions of Automations, and the steps you follow depend on which one your account is using.
* **The original Automations experience** builds one **When** trigger and one **Then** action at a time, from a panel inside the Editor you are working in. This page documents that version.
* **The upgraded Automations experience** builds Automations visually on a canvas, with multiple actions, branching logic, and multiple triggers in a single Automation.
Upgrading is your choice. When you open Automations, a banner invites you to move to the upgraded experience, and you upgrade by clicking **Explore and Upgrade**.
**Warning:** Upgrading fully replaces the original experience for your account and cannot be rolled back.
If your Automations open on a visual canvas rather than a panel, you are already on the upgraded experience, and the steps below will not match what you see. [Explore the upgraded Automations experience](/articles/marketing/automations/whats-new-with-kajabi-automations) covers what changed, and [Understand Automation components](/articles/marketing/automations/understanding-automation-components) lists every trigger, action, and filter available in it.
## Where to add an Automation
You can add custom Automations in numerous places on Kajabi:
* **Funnels** - When someone submits a Form to opt into your email list, then subscribe them to a welcome Email Sequence as the next step of your Funnel
* **Email Campaigns** - When an Email Broadcast is opened, then add an *opened email* Tag to the Contact record of the person who opened it
* **Events** - When someone registers for an Event, then send them an email with Event info
* **Forms** - When someone submits a Form to sign up for your free lead magnet product, then grant them the Offer for that product
* **Offers** - When someone purchases an Offer for your Course, then add a *paid student* Tag to the Contact record for that person
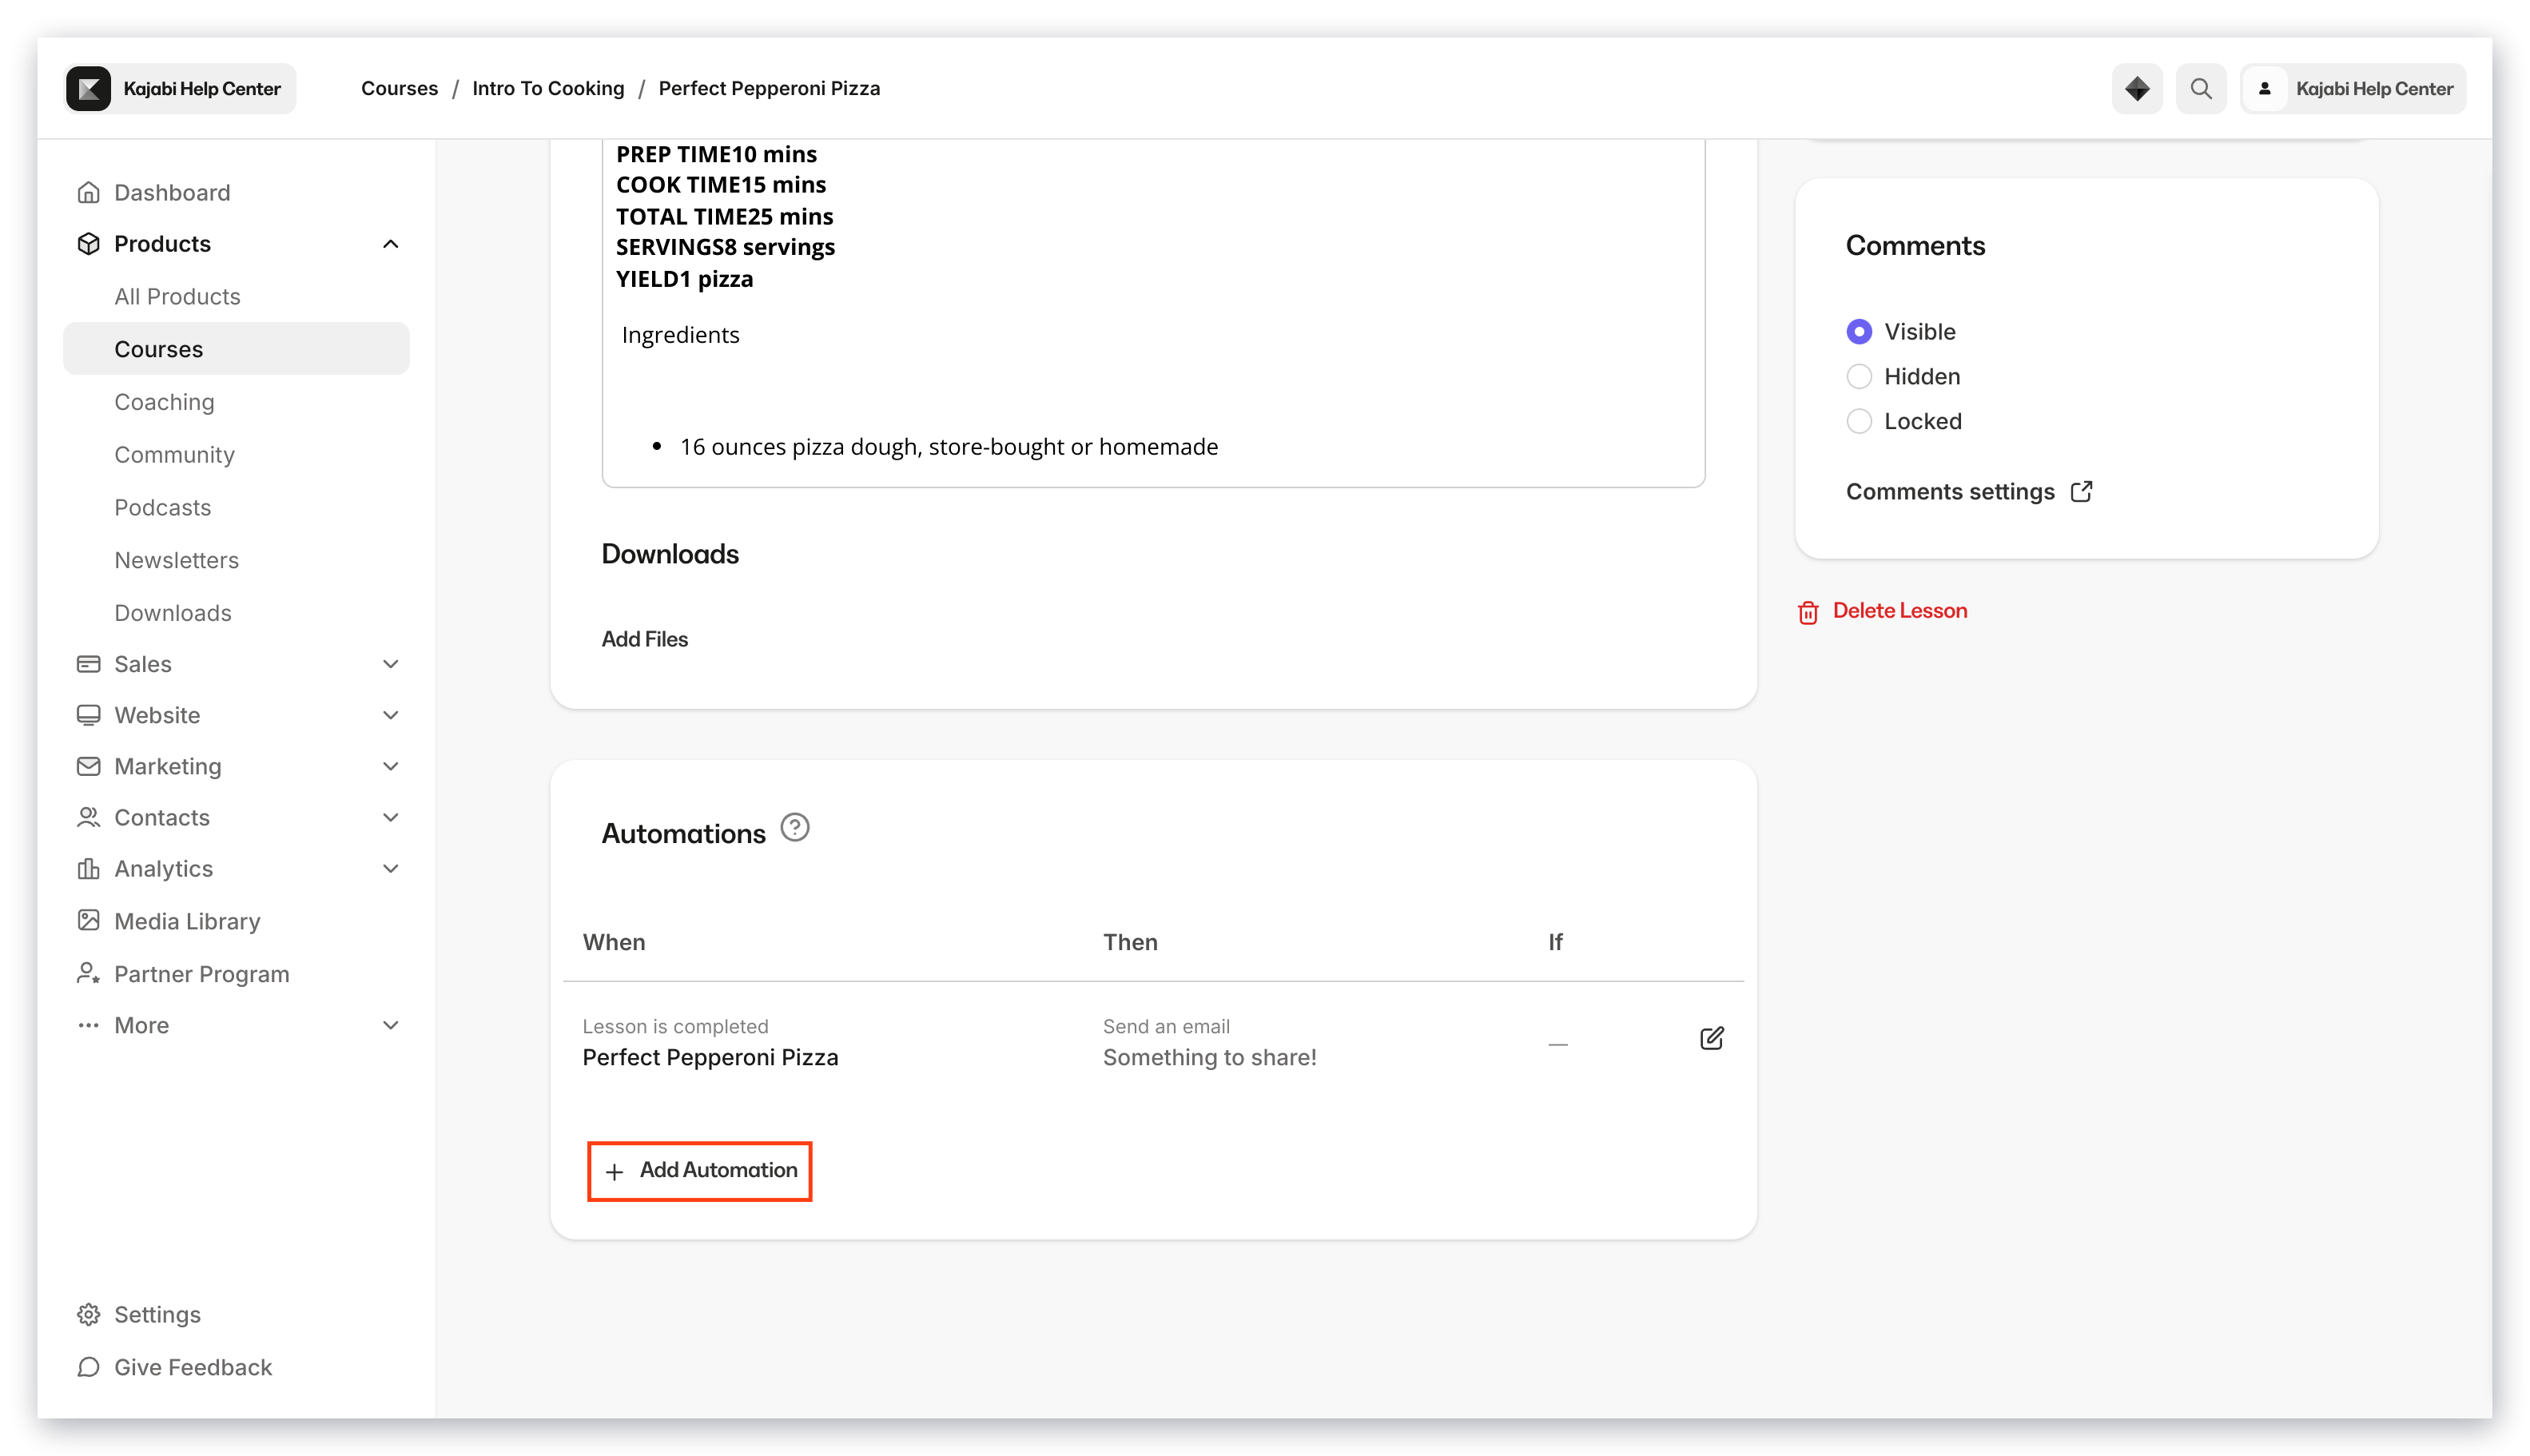
* **Course Lessons** - When a Lesson is completed, then send an email congratulating the person on their progress
* **Quizzes** - When a Quiz is passed, then add a *passed quiz* Tag to the Contact record for that person
* **Certificates of Completion** - When a Quiz is passed, then send a Certificate of Completion to that person
**Tip:** Look for the Automations section toward the bottom of whichever Editor you are working in.
### Create an Automation in the original experience
Wherever you are adding it from, the Automation itself is built the same way:
1. Click **+ Add Automation**.
2. Select a **When** action as an event trigger.
3. Choose a **Then** action as a response event.
4. Add a condition if desired (optional and only available with [Advanced Automations](/articles/marketing/automations/basic-vs-advanced-automations)).
5. Click **Save** to keep your changes.
On the upgraded experience you build the Automation on a canvas instead, where one trigger can lead to several actions. [Explore the upgraded Automations experience](/articles/marketing/automations/whats-new-with-kajabi-automations)
## Conditionals in Automations
Conditionals in Automations allow you to add an **Only if** condition to your Automation.
This feature is only available with [Advanced Automations](/articles/marketing/automations/basic-vs-advanced-automations).
For example, you want to add a Tag to all contacts who submitted a Form, but only if they answered a question on that Form with a specific answer.
**Note:** The conditional filter matches the collected data and your specified value based on "contains" rather than an "exact match."
### Example scenario
You're creating a customer color survey to find out what the most common favorite color is among your customers.
1. Create a Form with a custom field asking "What is your favorite color?"
2. Add specific answers to choose from, or leave it open-ended.
3. Add the Automation either directly from the Form Editor, or from the Automations Dashboard under the **Marketing** tab.
4. If you just created a Form or added a Form field, click **Save** at the upper right of the Form Editor to save and apply your changes.
5. Click **Add Automation**.
6. The **When** action is already selected if you are creating the Automation from the Form editing page (i.e. "When form is submitted"). Choose your **Then** action. In this example, select the **Add a tag** action.
7. Add your condition. Here, you only want to tag users with the "Blue" tag *if* they chose blue as their favorite color (navigate to the end of the dropdown menu under Custom Field Filters).
8. Click **Apply**, and then **Save**.
**Note:** This same Automation can be created and configured in the Automations Dashboard under the **Marketing** tab.
## Add an Automation from each location
### Add an Automation to a Funnel
1. Navigate to the dashboard and go to the **Marketing** tab.
2. Click **Funnels** to view your Funnels.
3. Create a new Funnel or edit an existing Funnel.
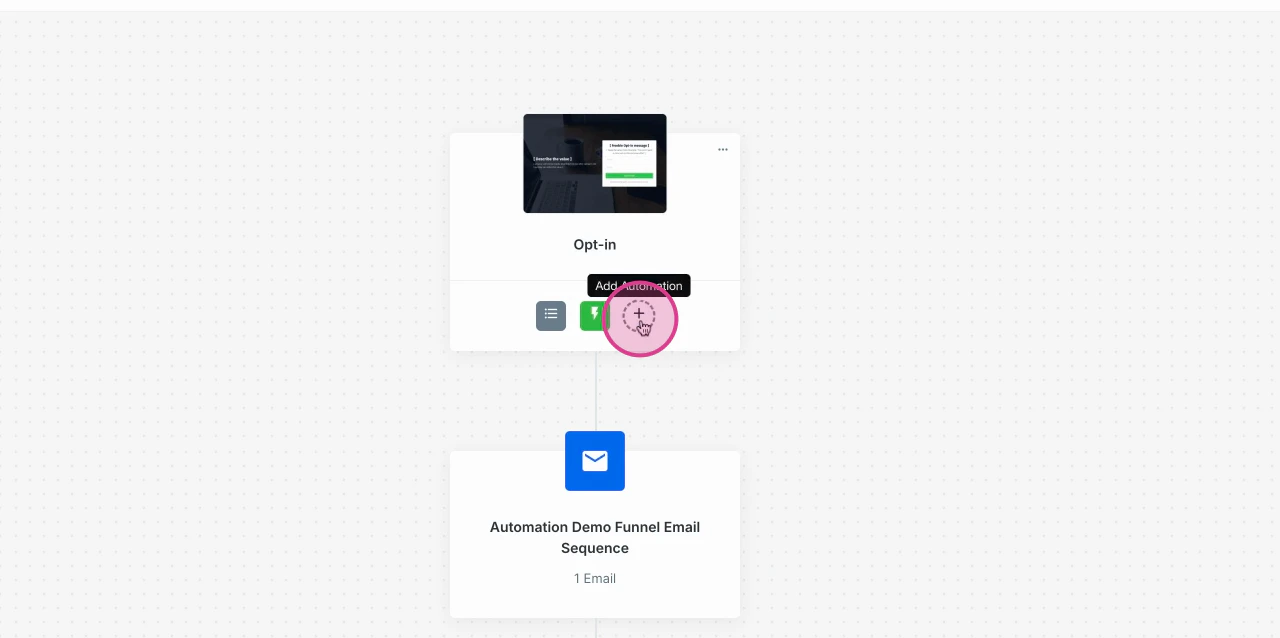
4. Click the **+** icon to add an Automation to the Funnel.
 5. Create your Automation: define the trigger, actions, and any conditions as needed.
6. Click **Save** once you're done to apply the Automation to the Funnel.
**Note:** You can add multiple Automations to a single funnel to run different actions for different triggers.
Make sure to click **Save** after editing so your Automation is activated.
[Learn more about Funnels on Kajabi](/articles/marketing/funnels/funnels-in-kajabi)
### Add an Automation to an Email Campaign
1. Open the **Marketing** tab from the Dashboard.
2. Click **Email Campaigns**.
3. Create a [new Email Campaign](/articles/marketing/email-campaigns/email-campaigns-overview) or edit an existing one.
[Learn more about Email Campaigns on Kajabi](/articles/marketing/email-campaigns/email-campaigns-overview)
#### Email Broadcast
Click **+ Add Automation** in the Content Editor:
5. Create your Automation: define the trigger, actions, and any conditions as needed.
6. Click **Save** once you're done to apply the Automation to the Funnel.
**Note:** You can add multiple Automations to a single funnel to run different actions for different triggers.
Make sure to click **Save** after editing so your Automation is activated.
[Learn more about Funnels on Kajabi](/articles/marketing/funnels/funnels-in-kajabi)
### Add an Automation to an Email Campaign
1. Open the **Marketing** tab from the Dashboard.
2. Click **Email Campaigns**.
3. Create a [new Email Campaign](/articles/marketing/email-campaigns/email-campaigns-overview) or edit an existing one.
[Learn more about Email Campaigns on Kajabi](/articles/marketing/email-campaigns/email-campaigns-overview)
#### Email Broadcast
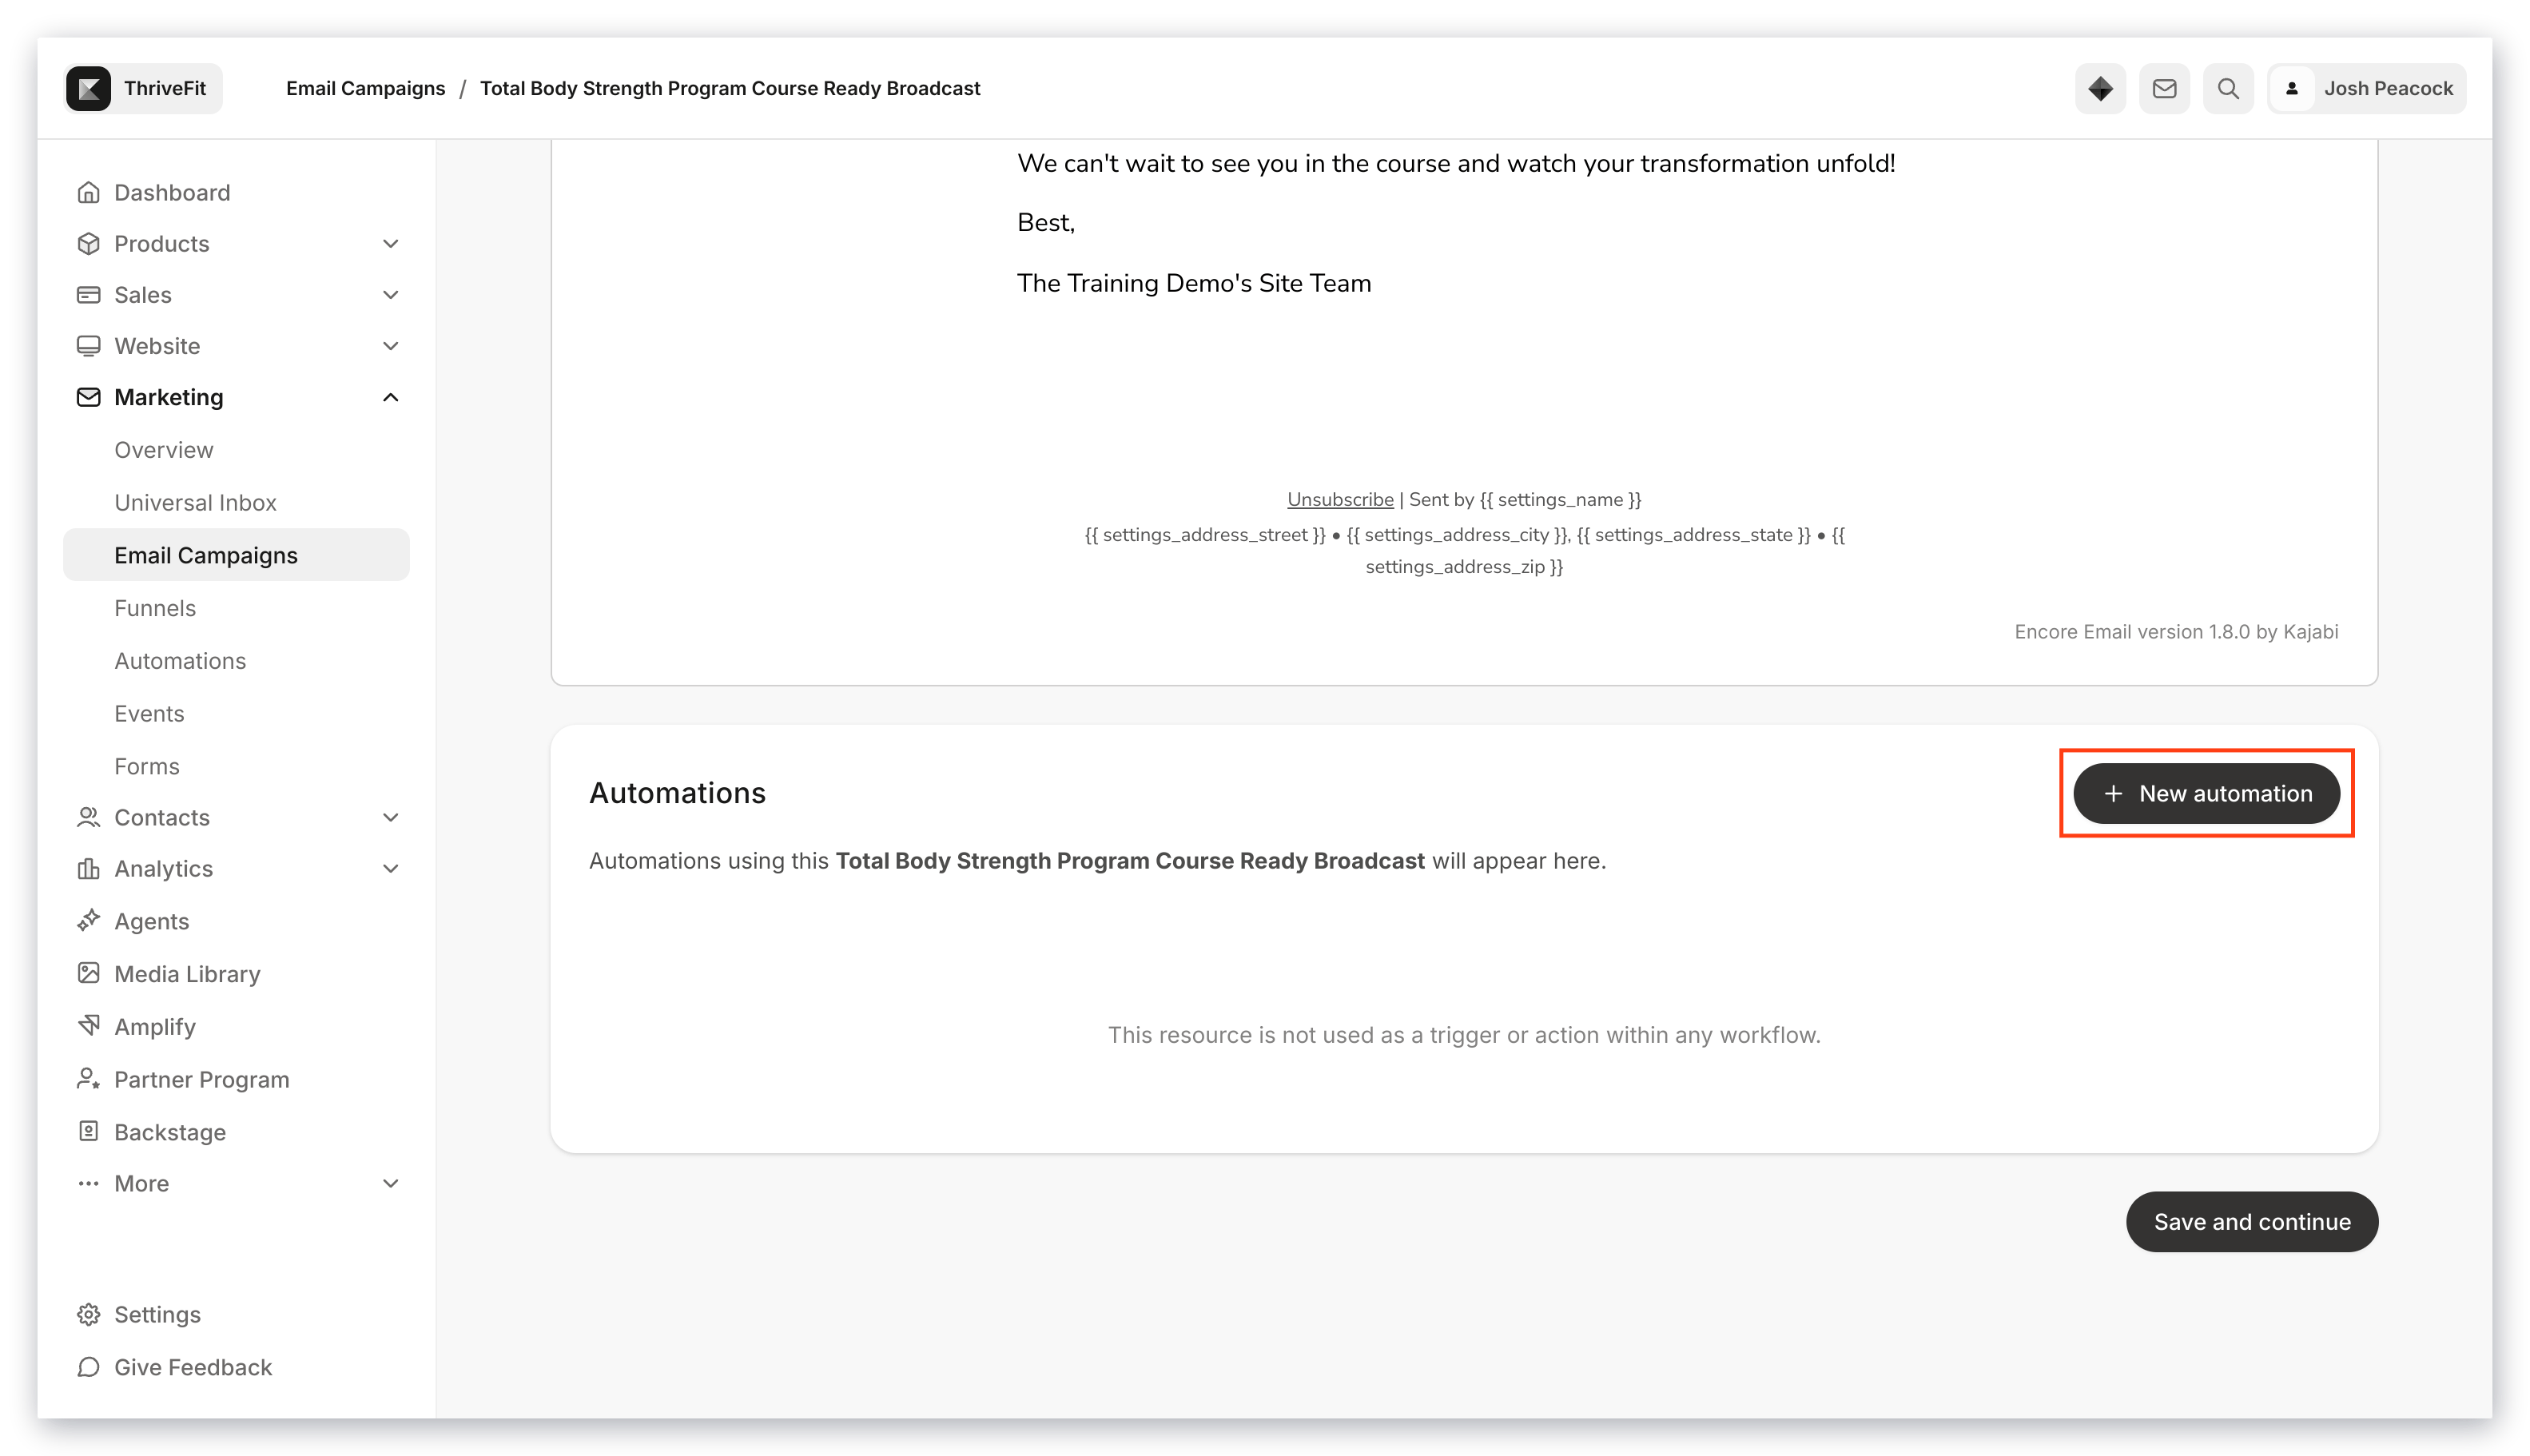
Click **+ Add Automation** in the Content Editor:
 #### Email Sequence
Click **+ Add Automation** for the email you wish to edit or create a Subscribe/Unsubscribe trigger:
#### Email Sequence
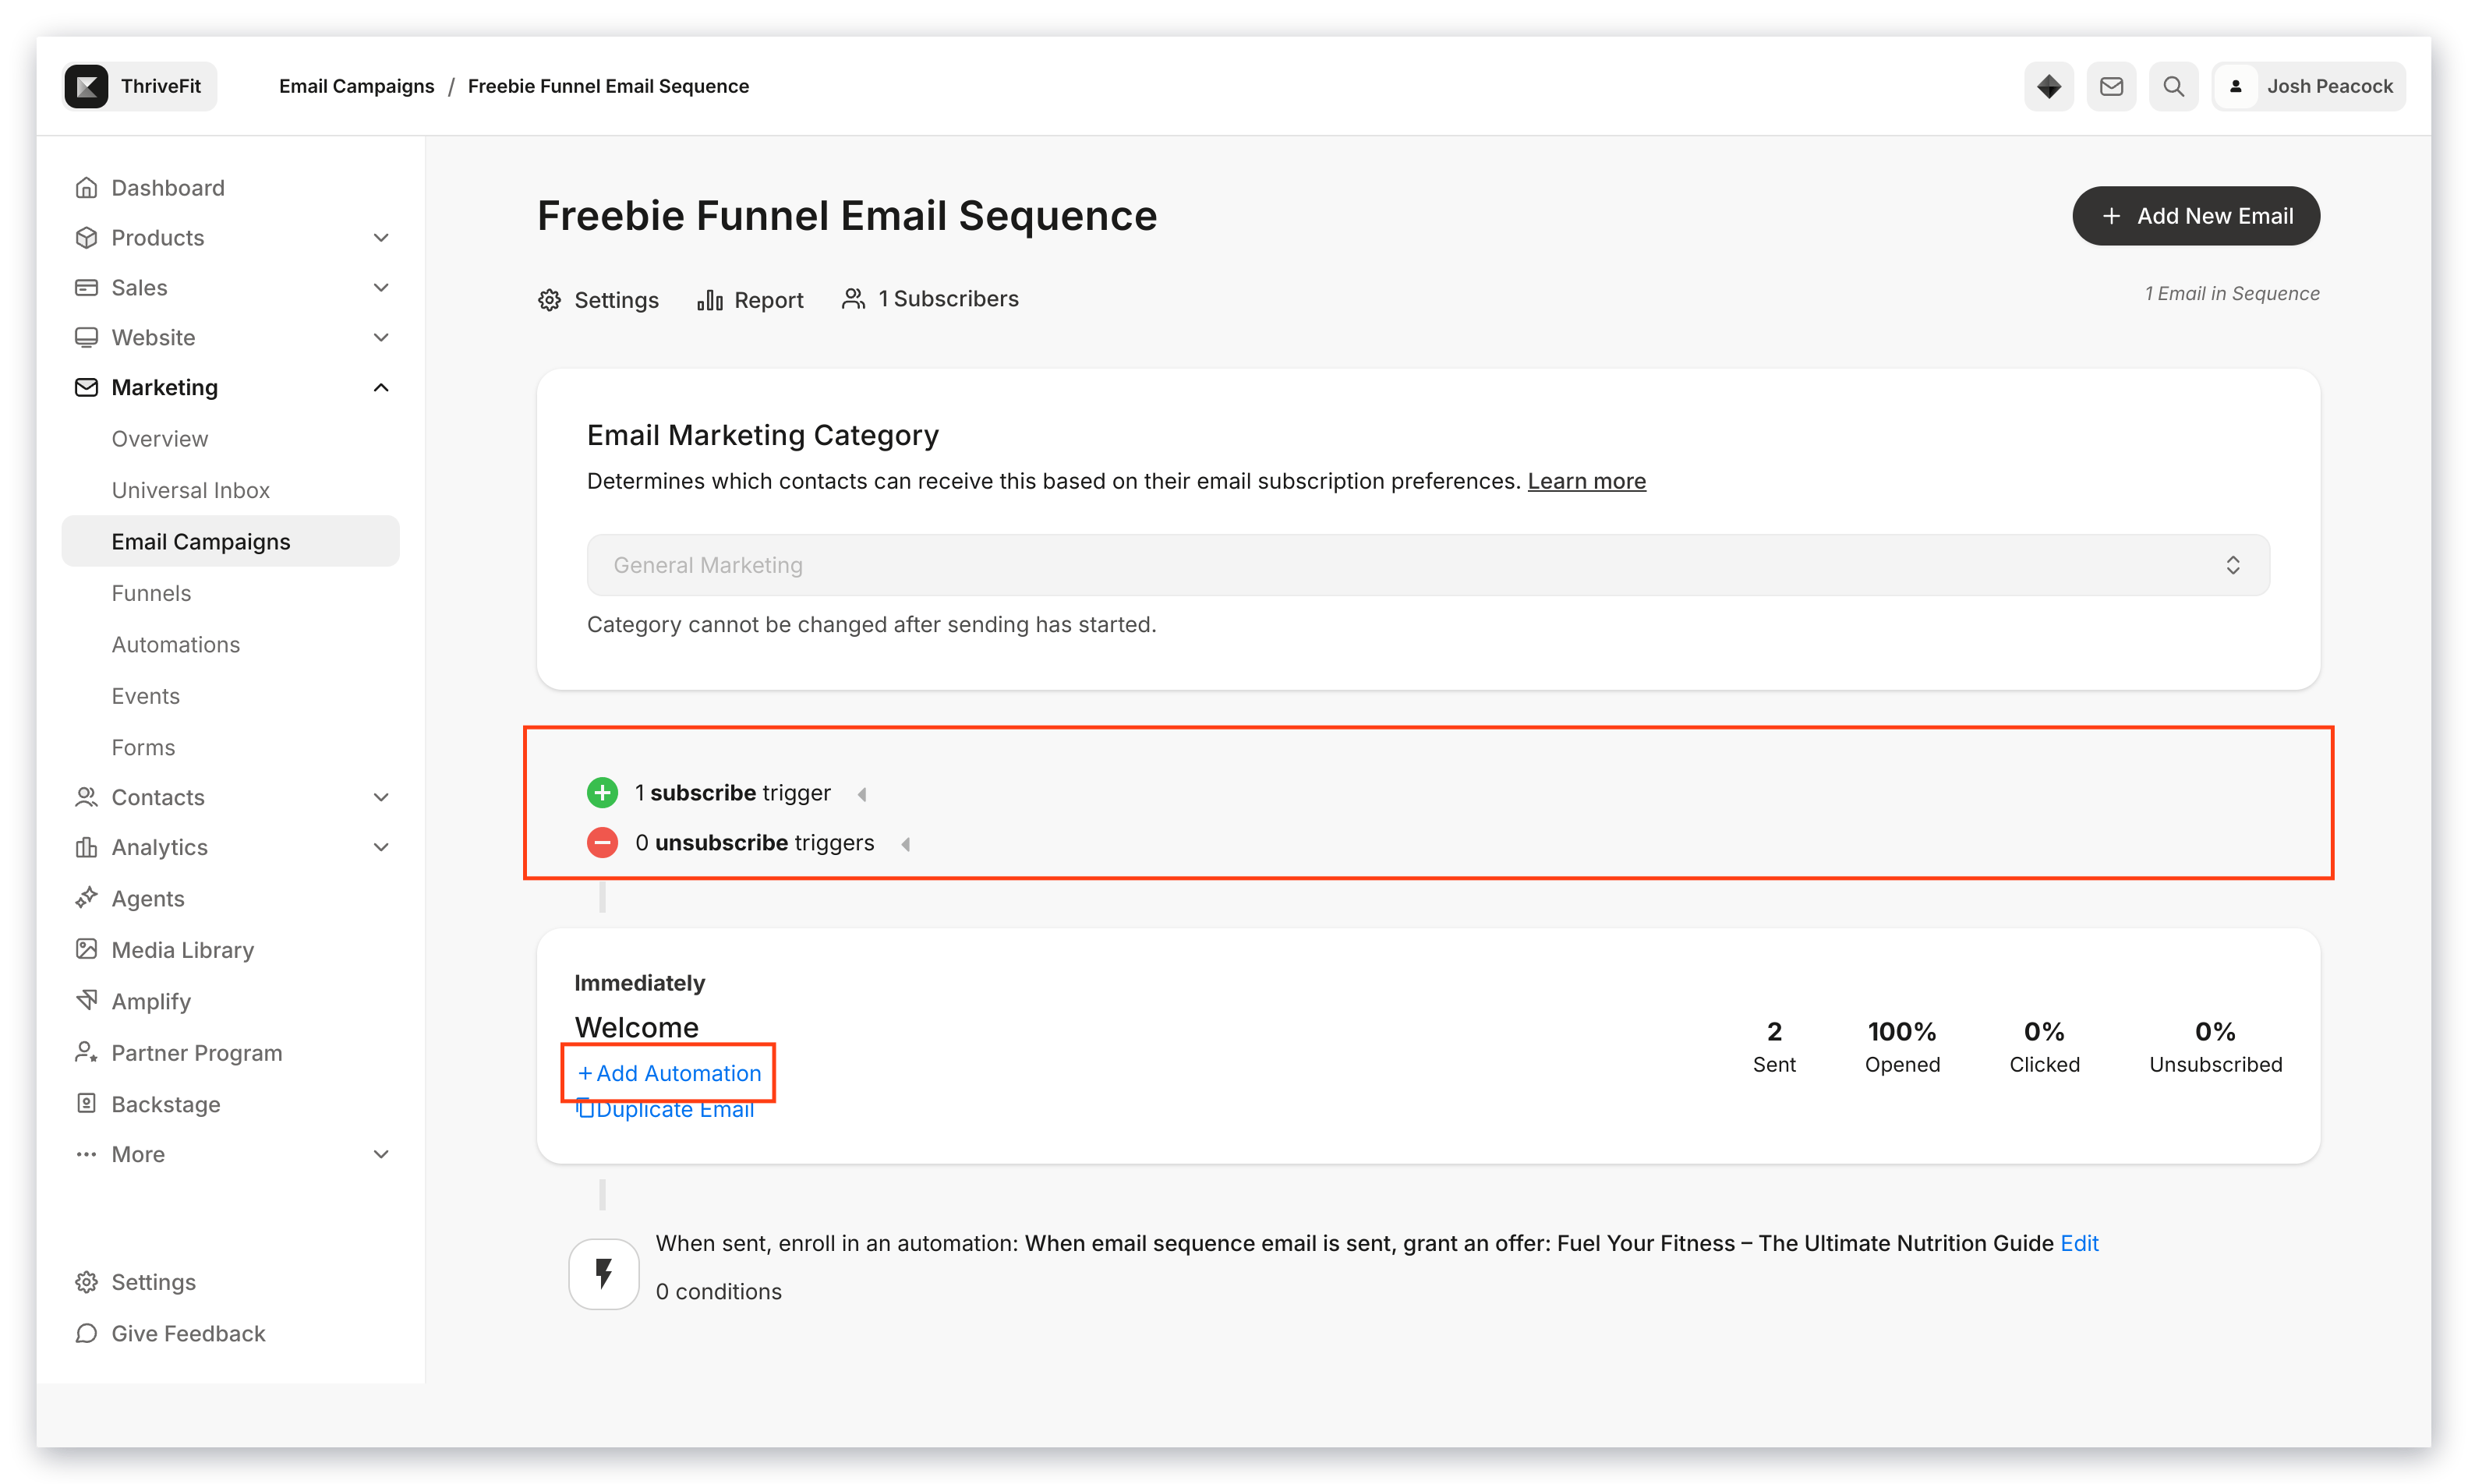
Click **+ Add Automation** for the email you wish to edit or create a Subscribe/Unsubscribe trigger:
 ### Add an Automation to an Event
1. Open the **Marketing** tab from the Dashboard.
2. Select **Events**.
3. Create a new Event or edit an existing one.
4. Click **+ Add Automation**.
5. Create your Automation as desired.
### Add an Automation to an Event
1. Open the **Marketing** tab from the Dashboard.
2. Select **Events**.
3. Create a new Event or edit an existing one.
4. Click **+ Add Automation**.
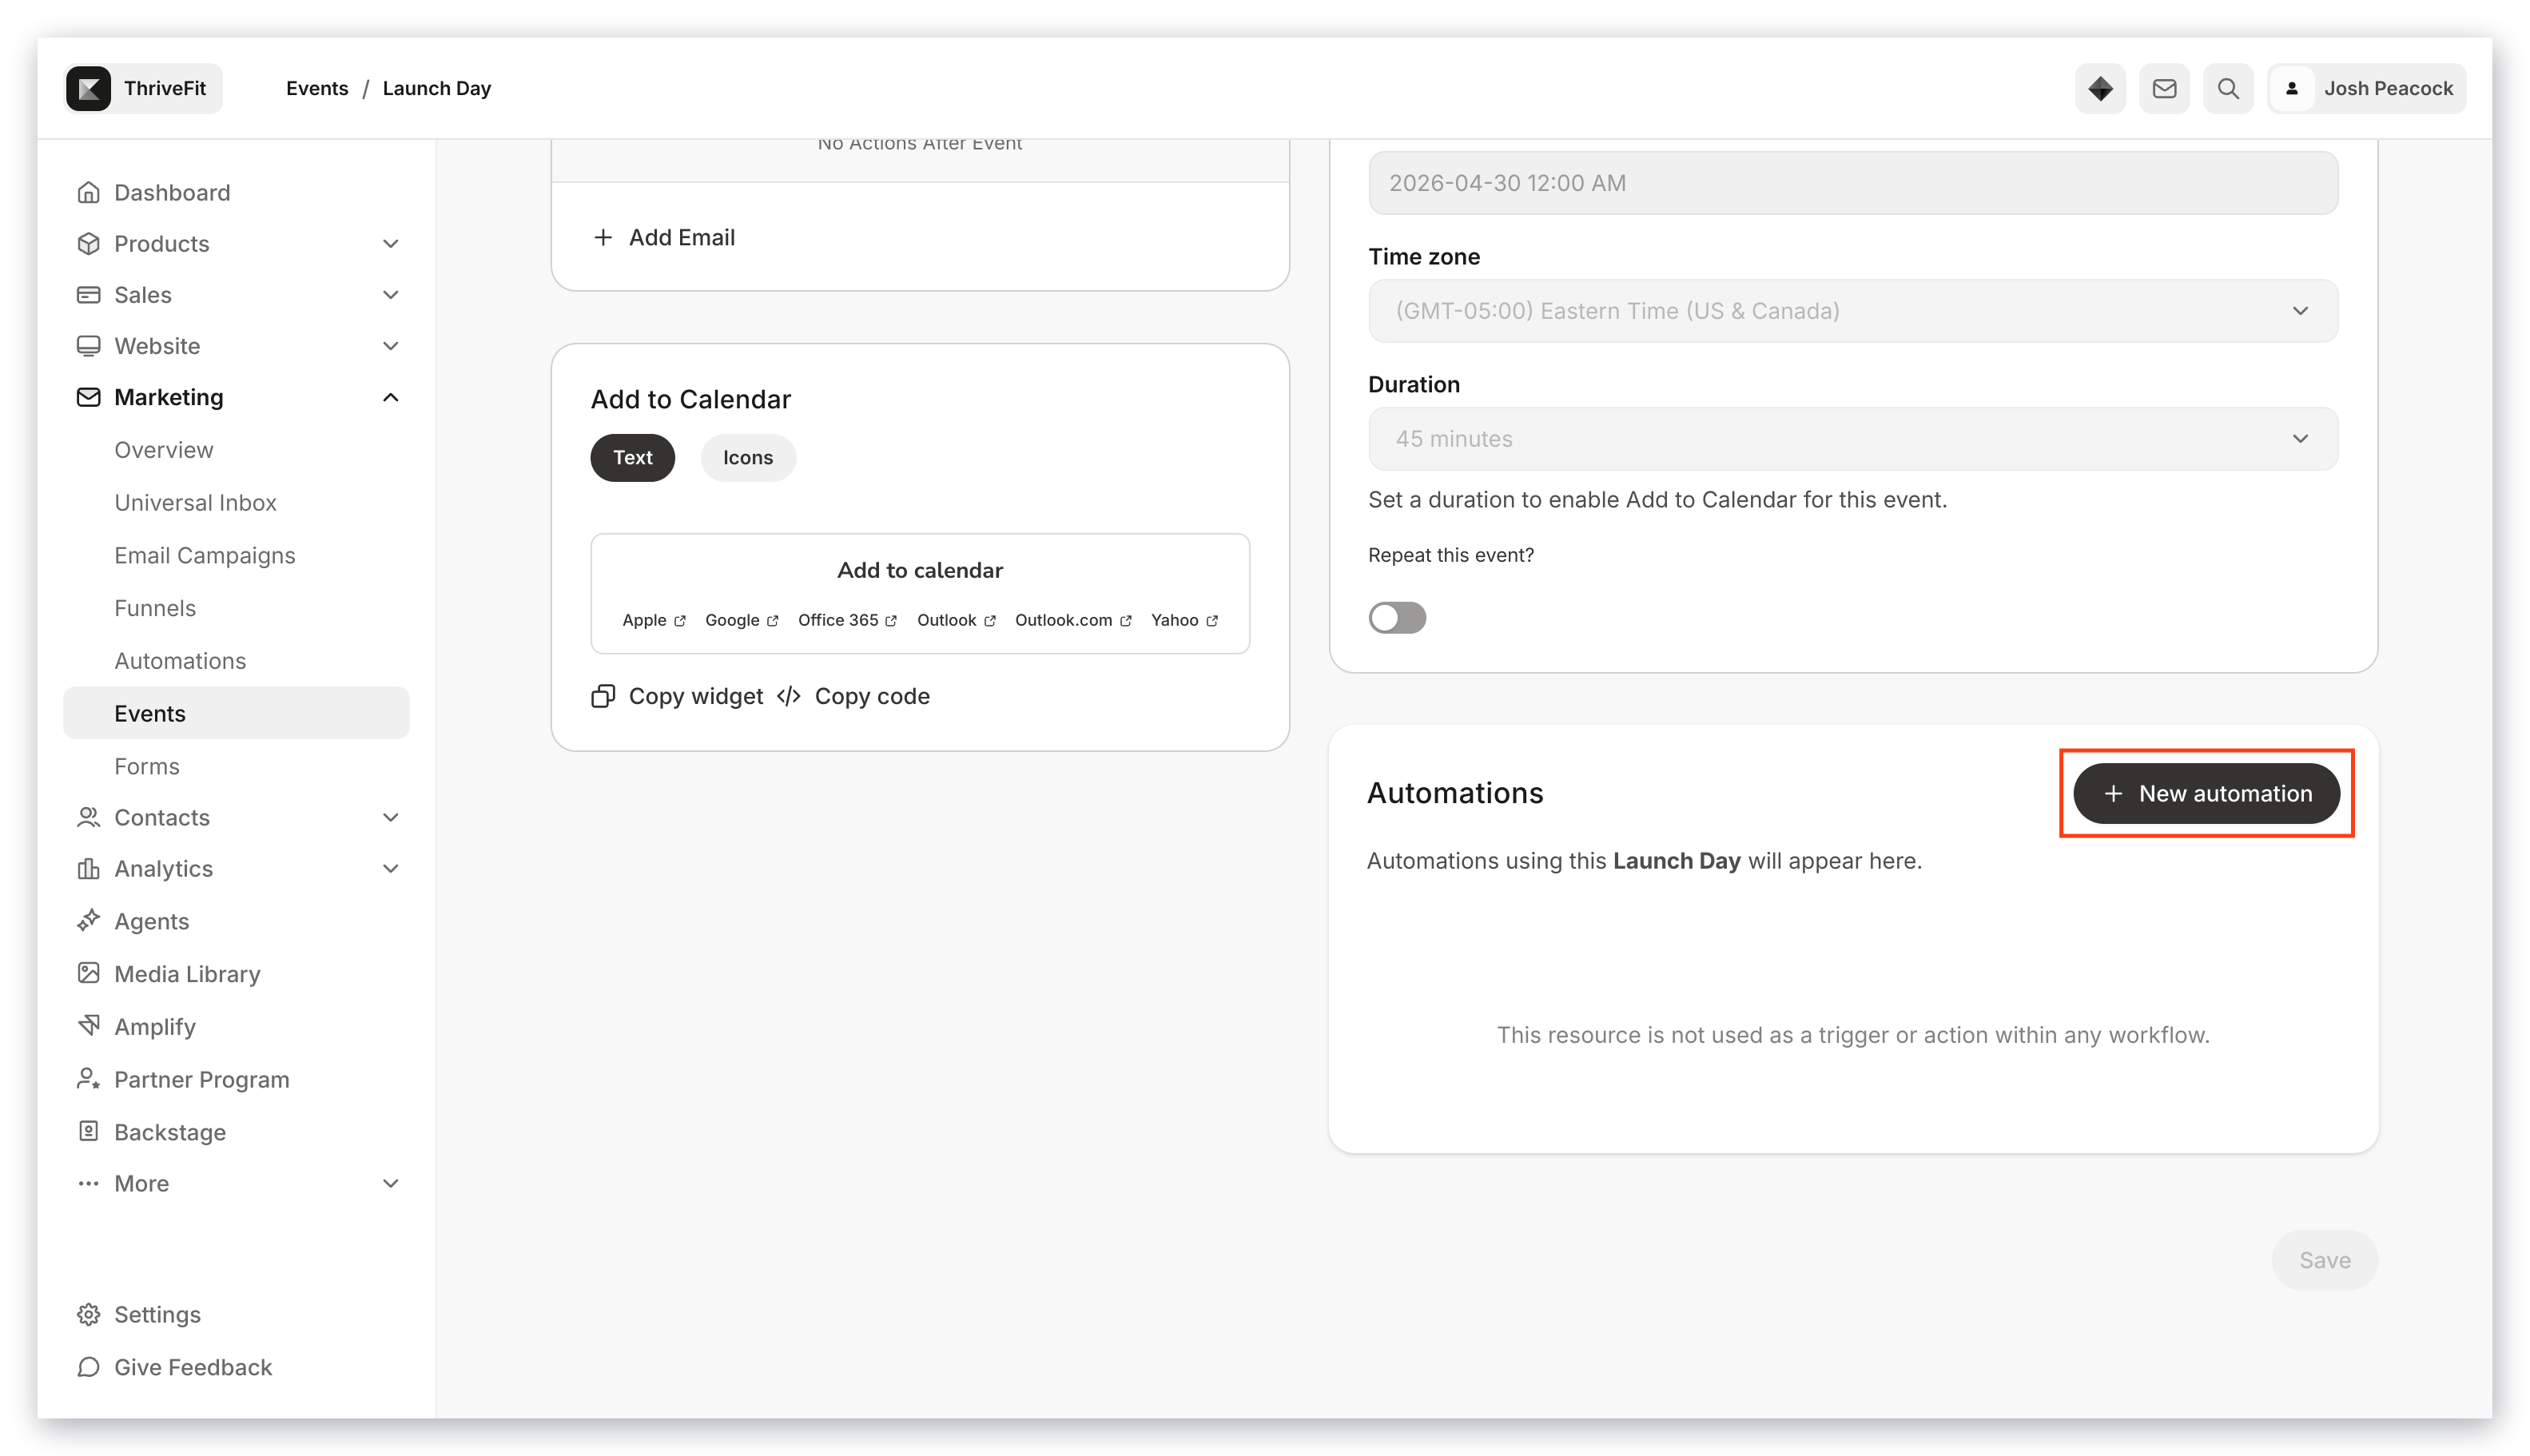
5. Create your Automation as desired.
 [Learn more about Events](/articles/marketing/events/event-overview)
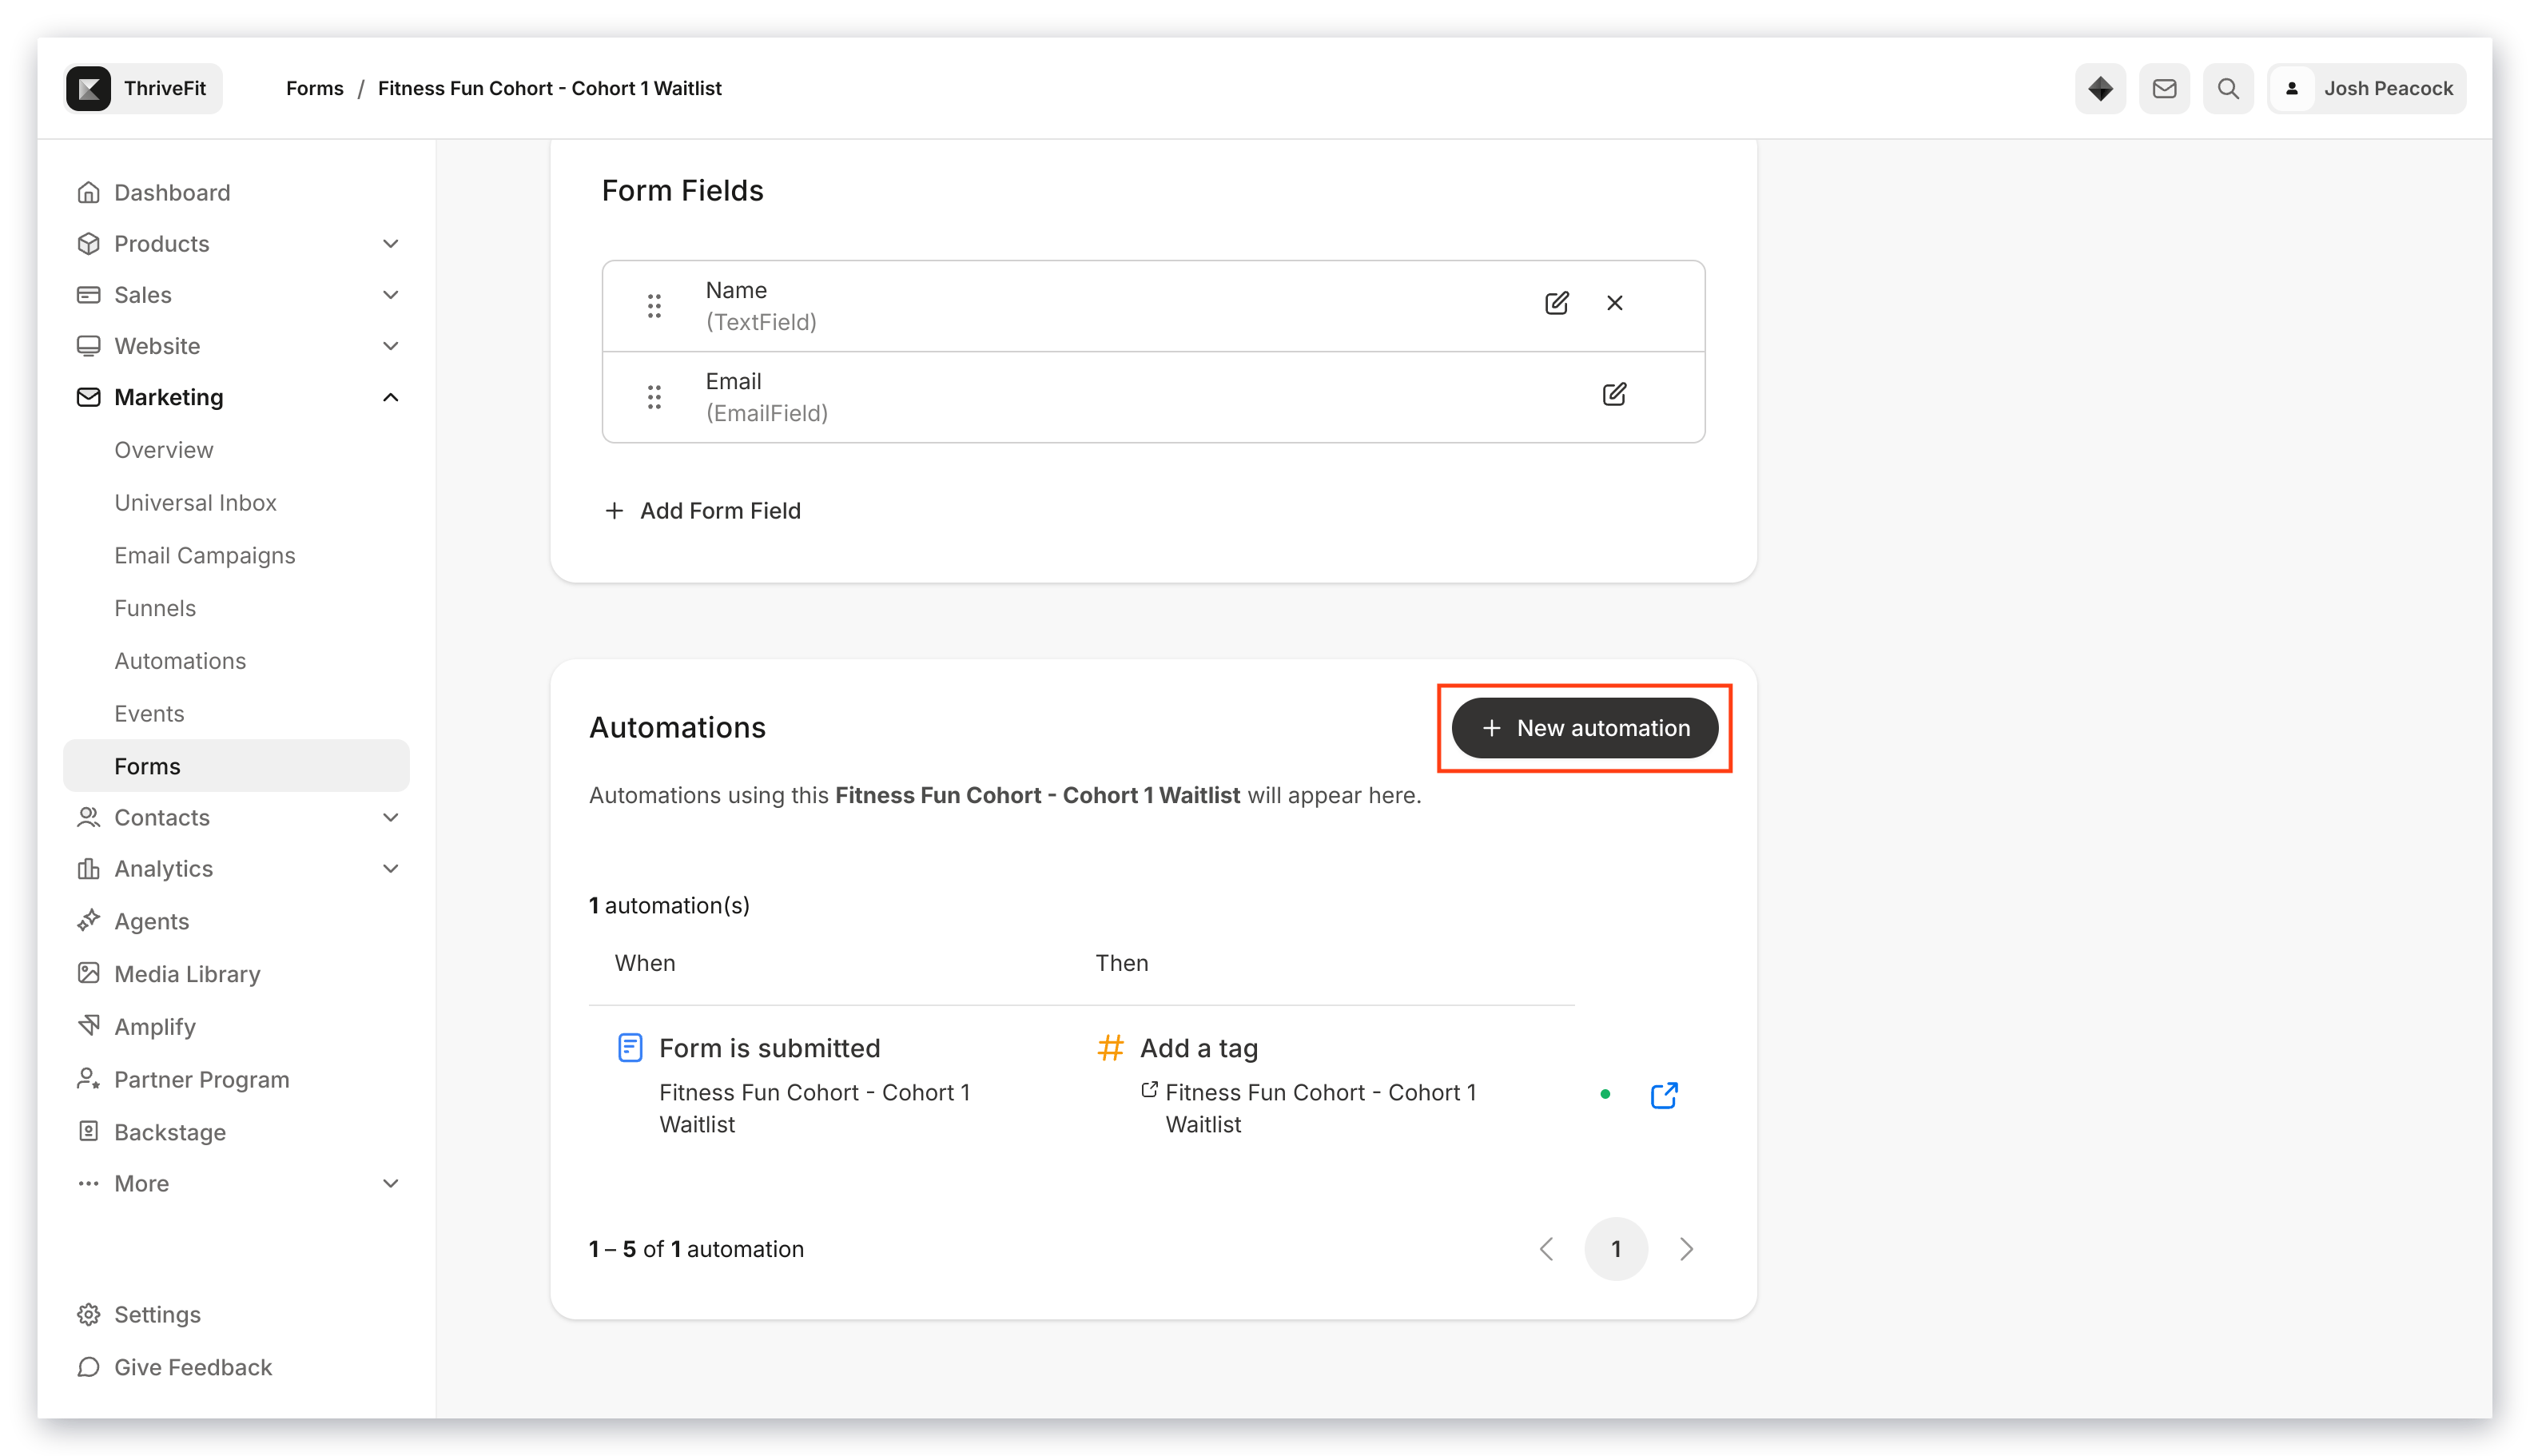
### Add an Automation to a Form
1. Open the **Marketing** tab from the Dashboard.
2. Select **Forms**.
3. Create a new **Form** or edit an existing one.
4. Click **+ Add Automation**.
5. Create your Automation as desired.
[Learn more about Events](/articles/marketing/events/event-overview)
### Add an Automation to a Form
1. Open the **Marketing** tab from the Dashboard.
2. Select **Forms**.
3. Create a new **Form** or edit an existing one.
4. Click **+ Add Automation**.
5. Create your Automation as desired.
 [Learn more about Forms](/articles/marketing/forms/create-and-build-your-form)
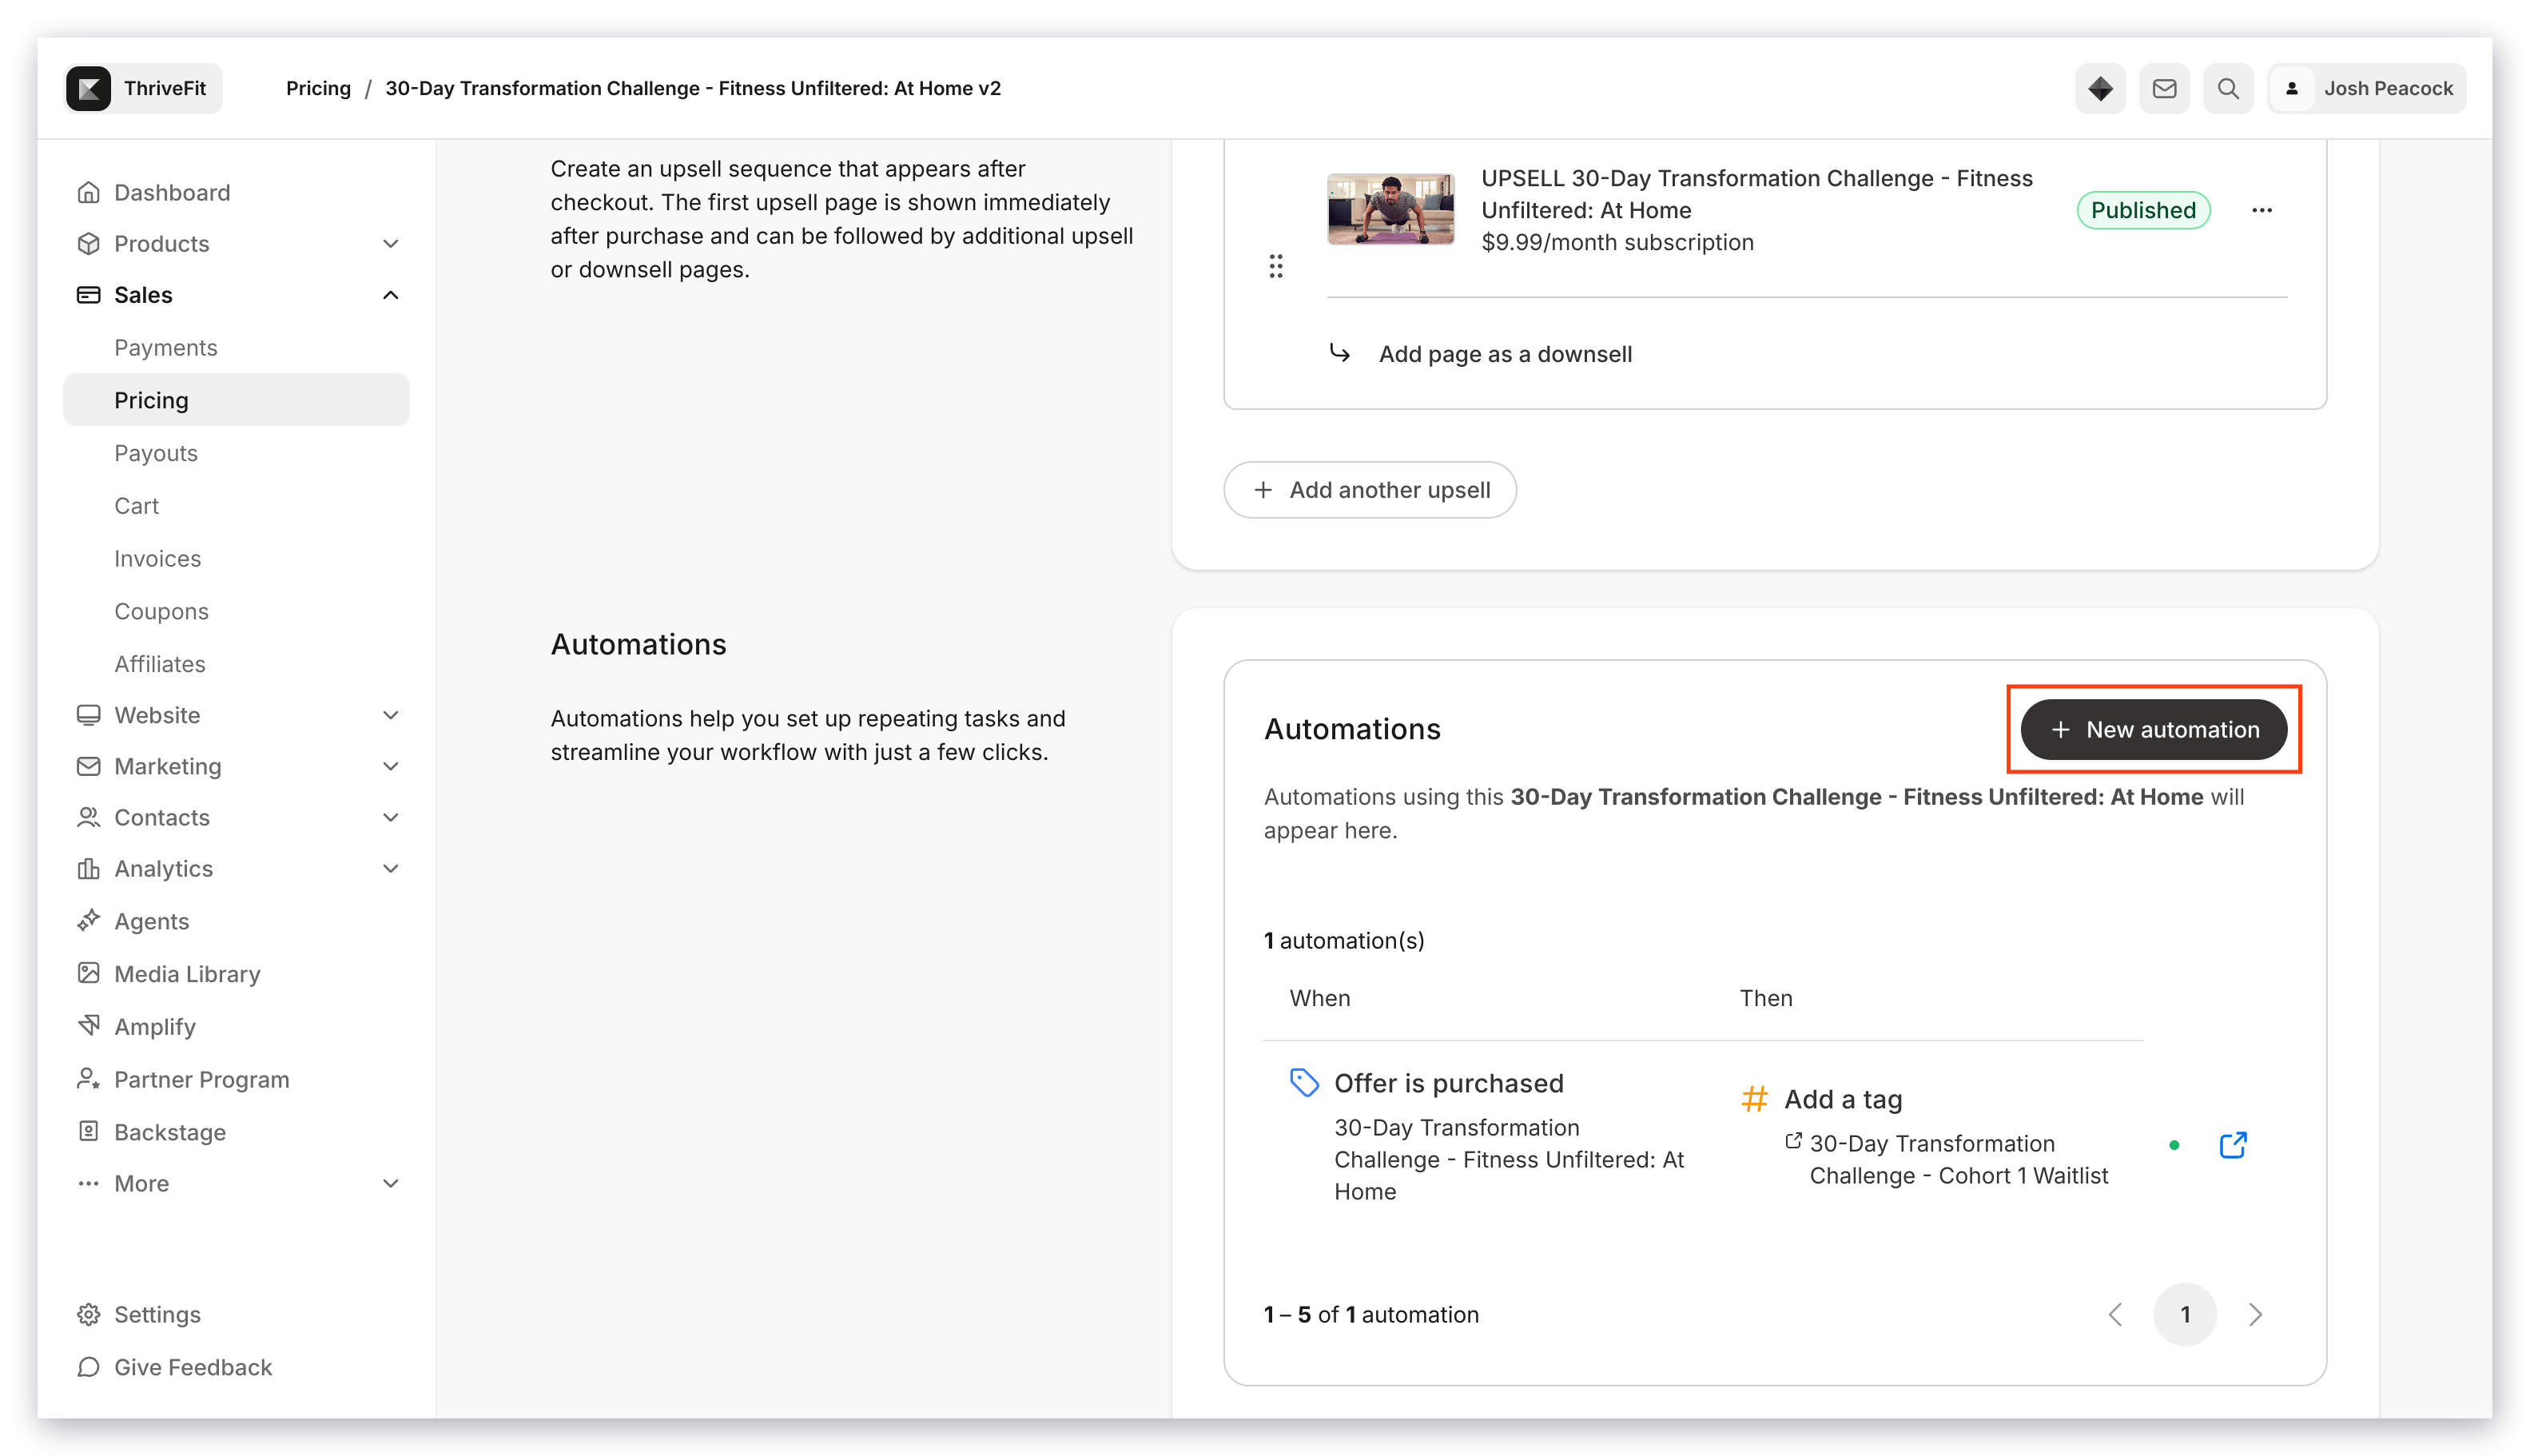
### Add an Automation to an Offer
1. Open the **Sales** tab from the Dashboard.
2. Select **Pricing**.
3. Create a new **Offer** or edit an existing one.
4. Click the **Purchase flow** tab.
5. Click **+ Add Automation**.
6. Create your Automation as desired.
[Learn more about Forms](/articles/marketing/forms/create-and-build-your-form)
### Add an Automation to an Offer
1. Open the **Sales** tab from the Dashboard.
2. Select **Pricing**.
3. Create a new **Offer** or edit an existing one.
4. Click the **Purchase flow** tab.
5. Click **+ Add Automation**.
6. Create your Automation as desired.
 [Learn more about Offers](/articles/sales/offers/offers-overview)
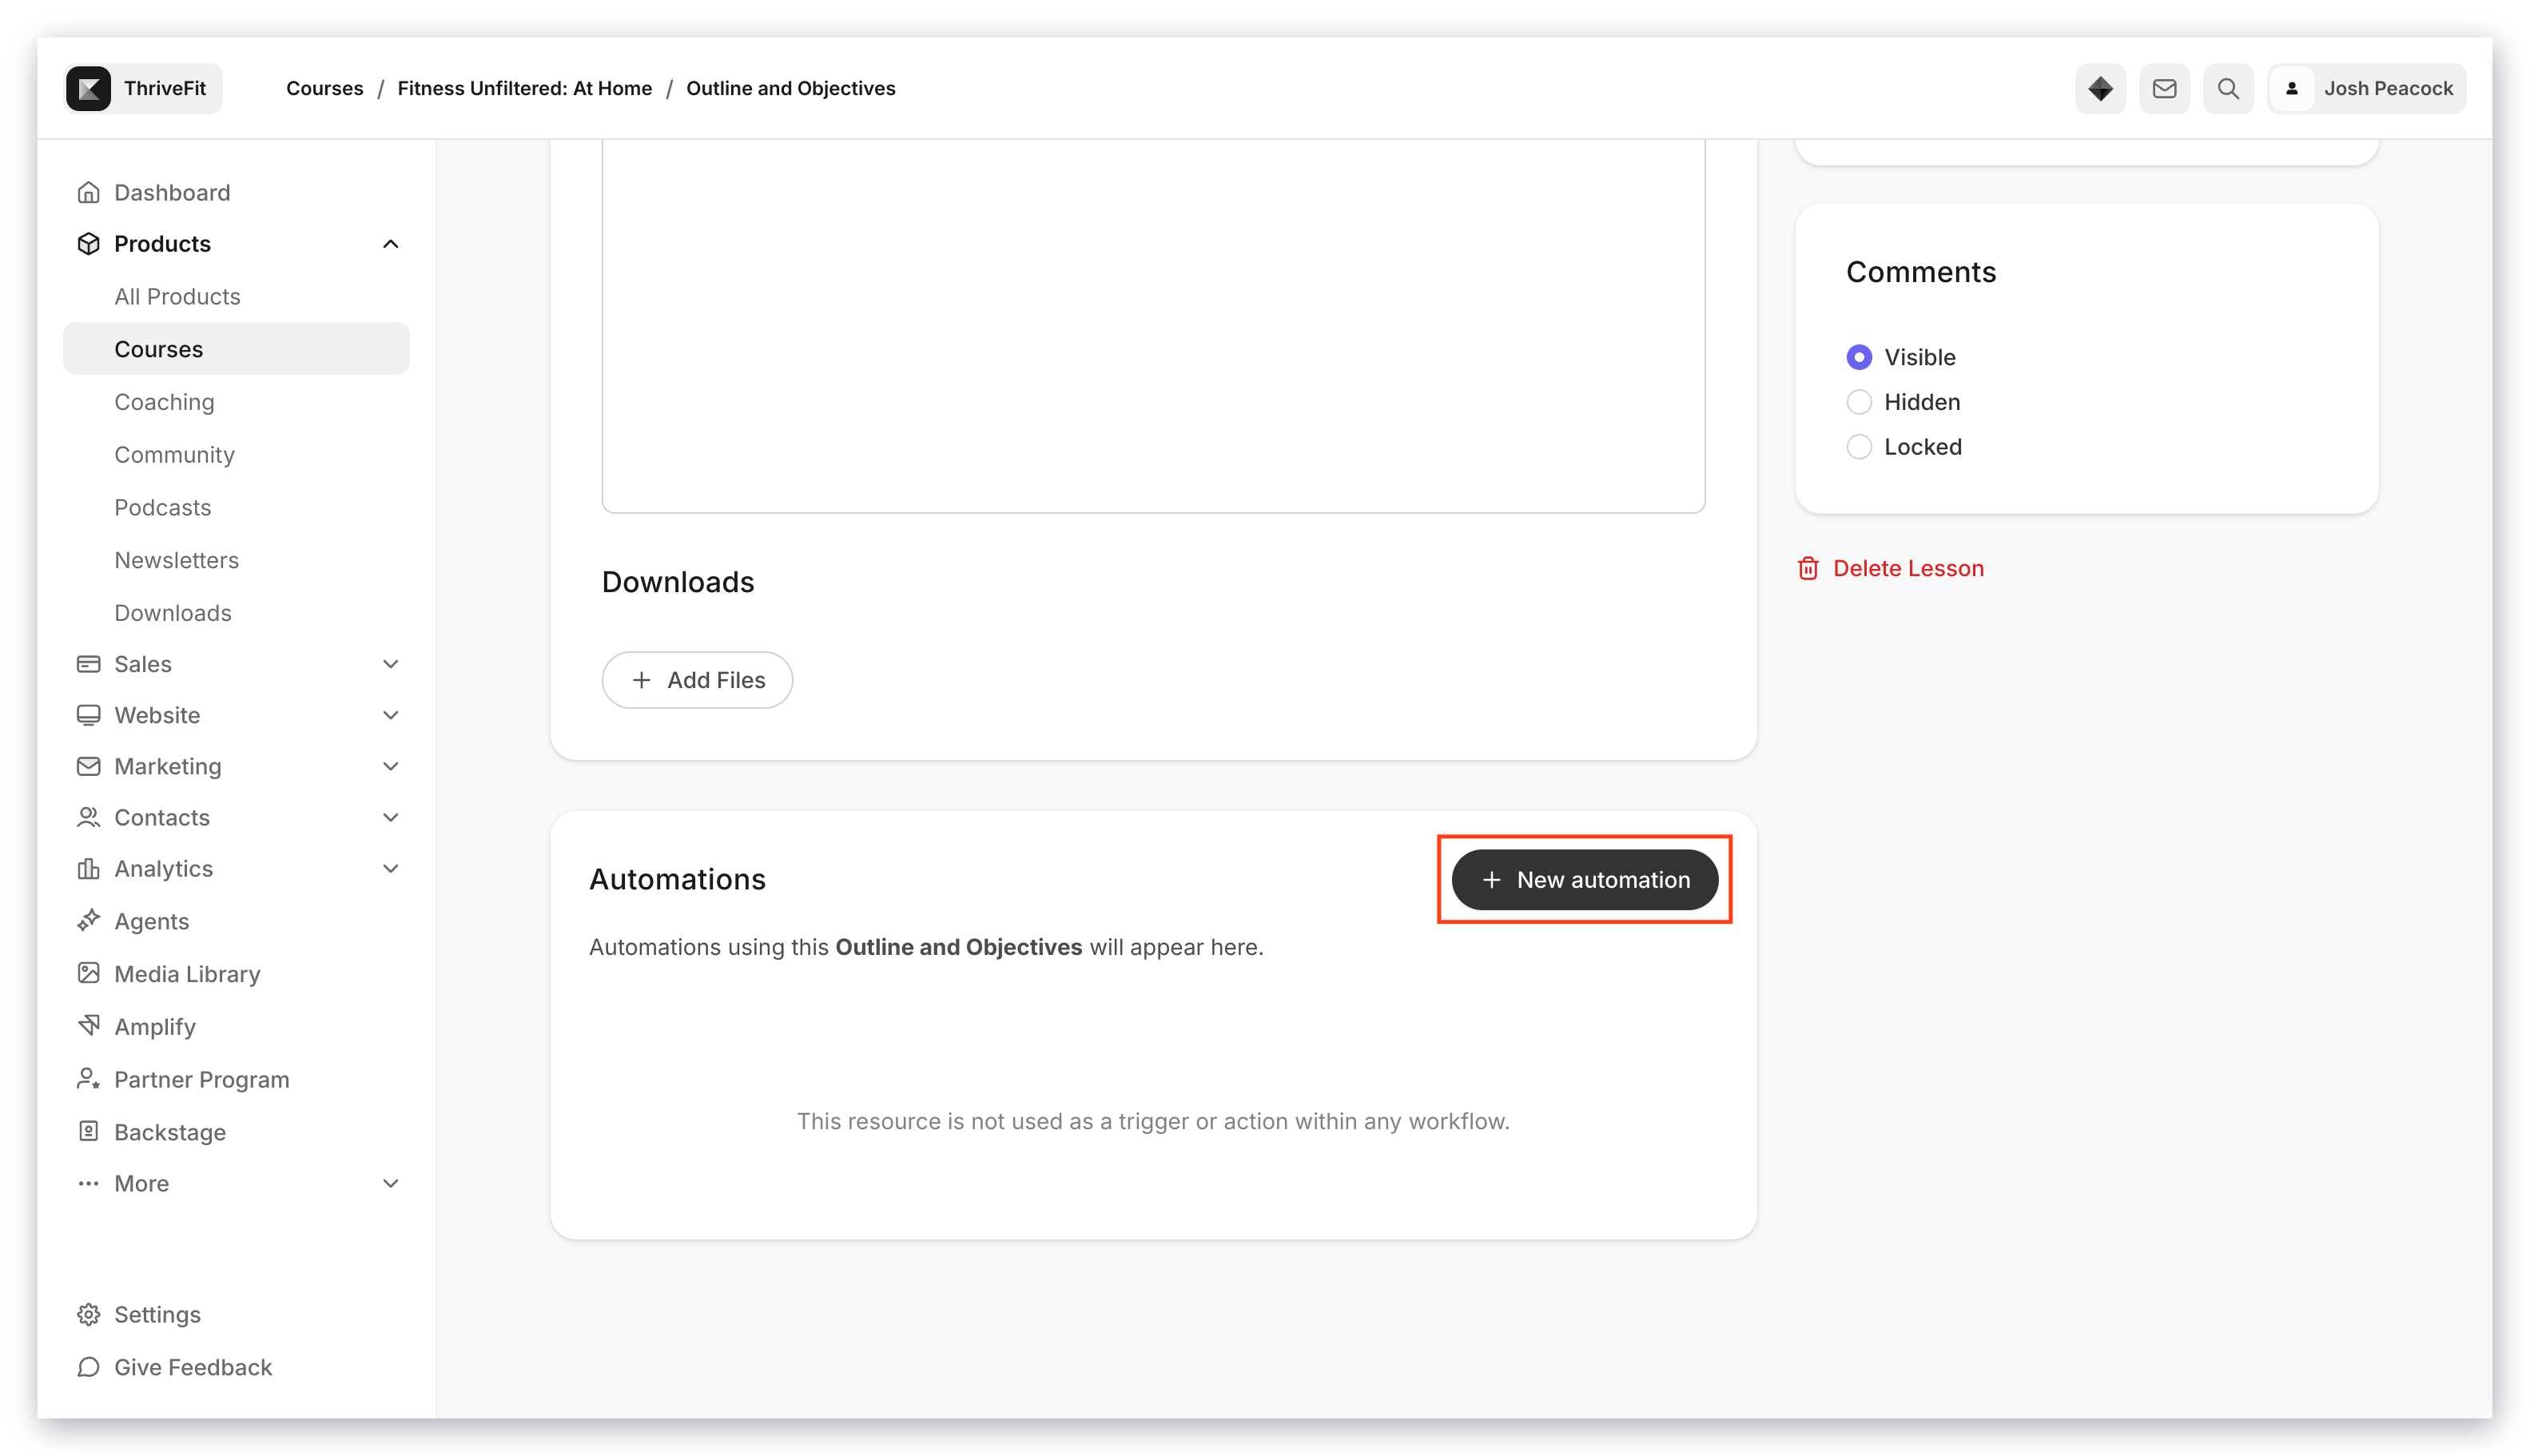
### Add an Automation to a Course Lesson
1. Open the **Products** tab from the Dashboard.
2. Select **Courses**.
3. Create a new Course or edit a **Lesson** in an existing Course.
4. Click **+ Add Automation**.
5. Create your Automation as desired.
[Learn more about Offers](/articles/sales/offers/offers-overview)
### Add an Automation to a Course Lesson
1. Open the **Products** tab from the Dashboard.
2. Select **Courses**.
3. Create a new Course or edit a **Lesson** in an existing Course.
4. Click **+ Add Automation**.
5. Create your Automation as desired.
 [Learn more about Course Lessons](/articles/products/products-overview/kajabi-products-overview)
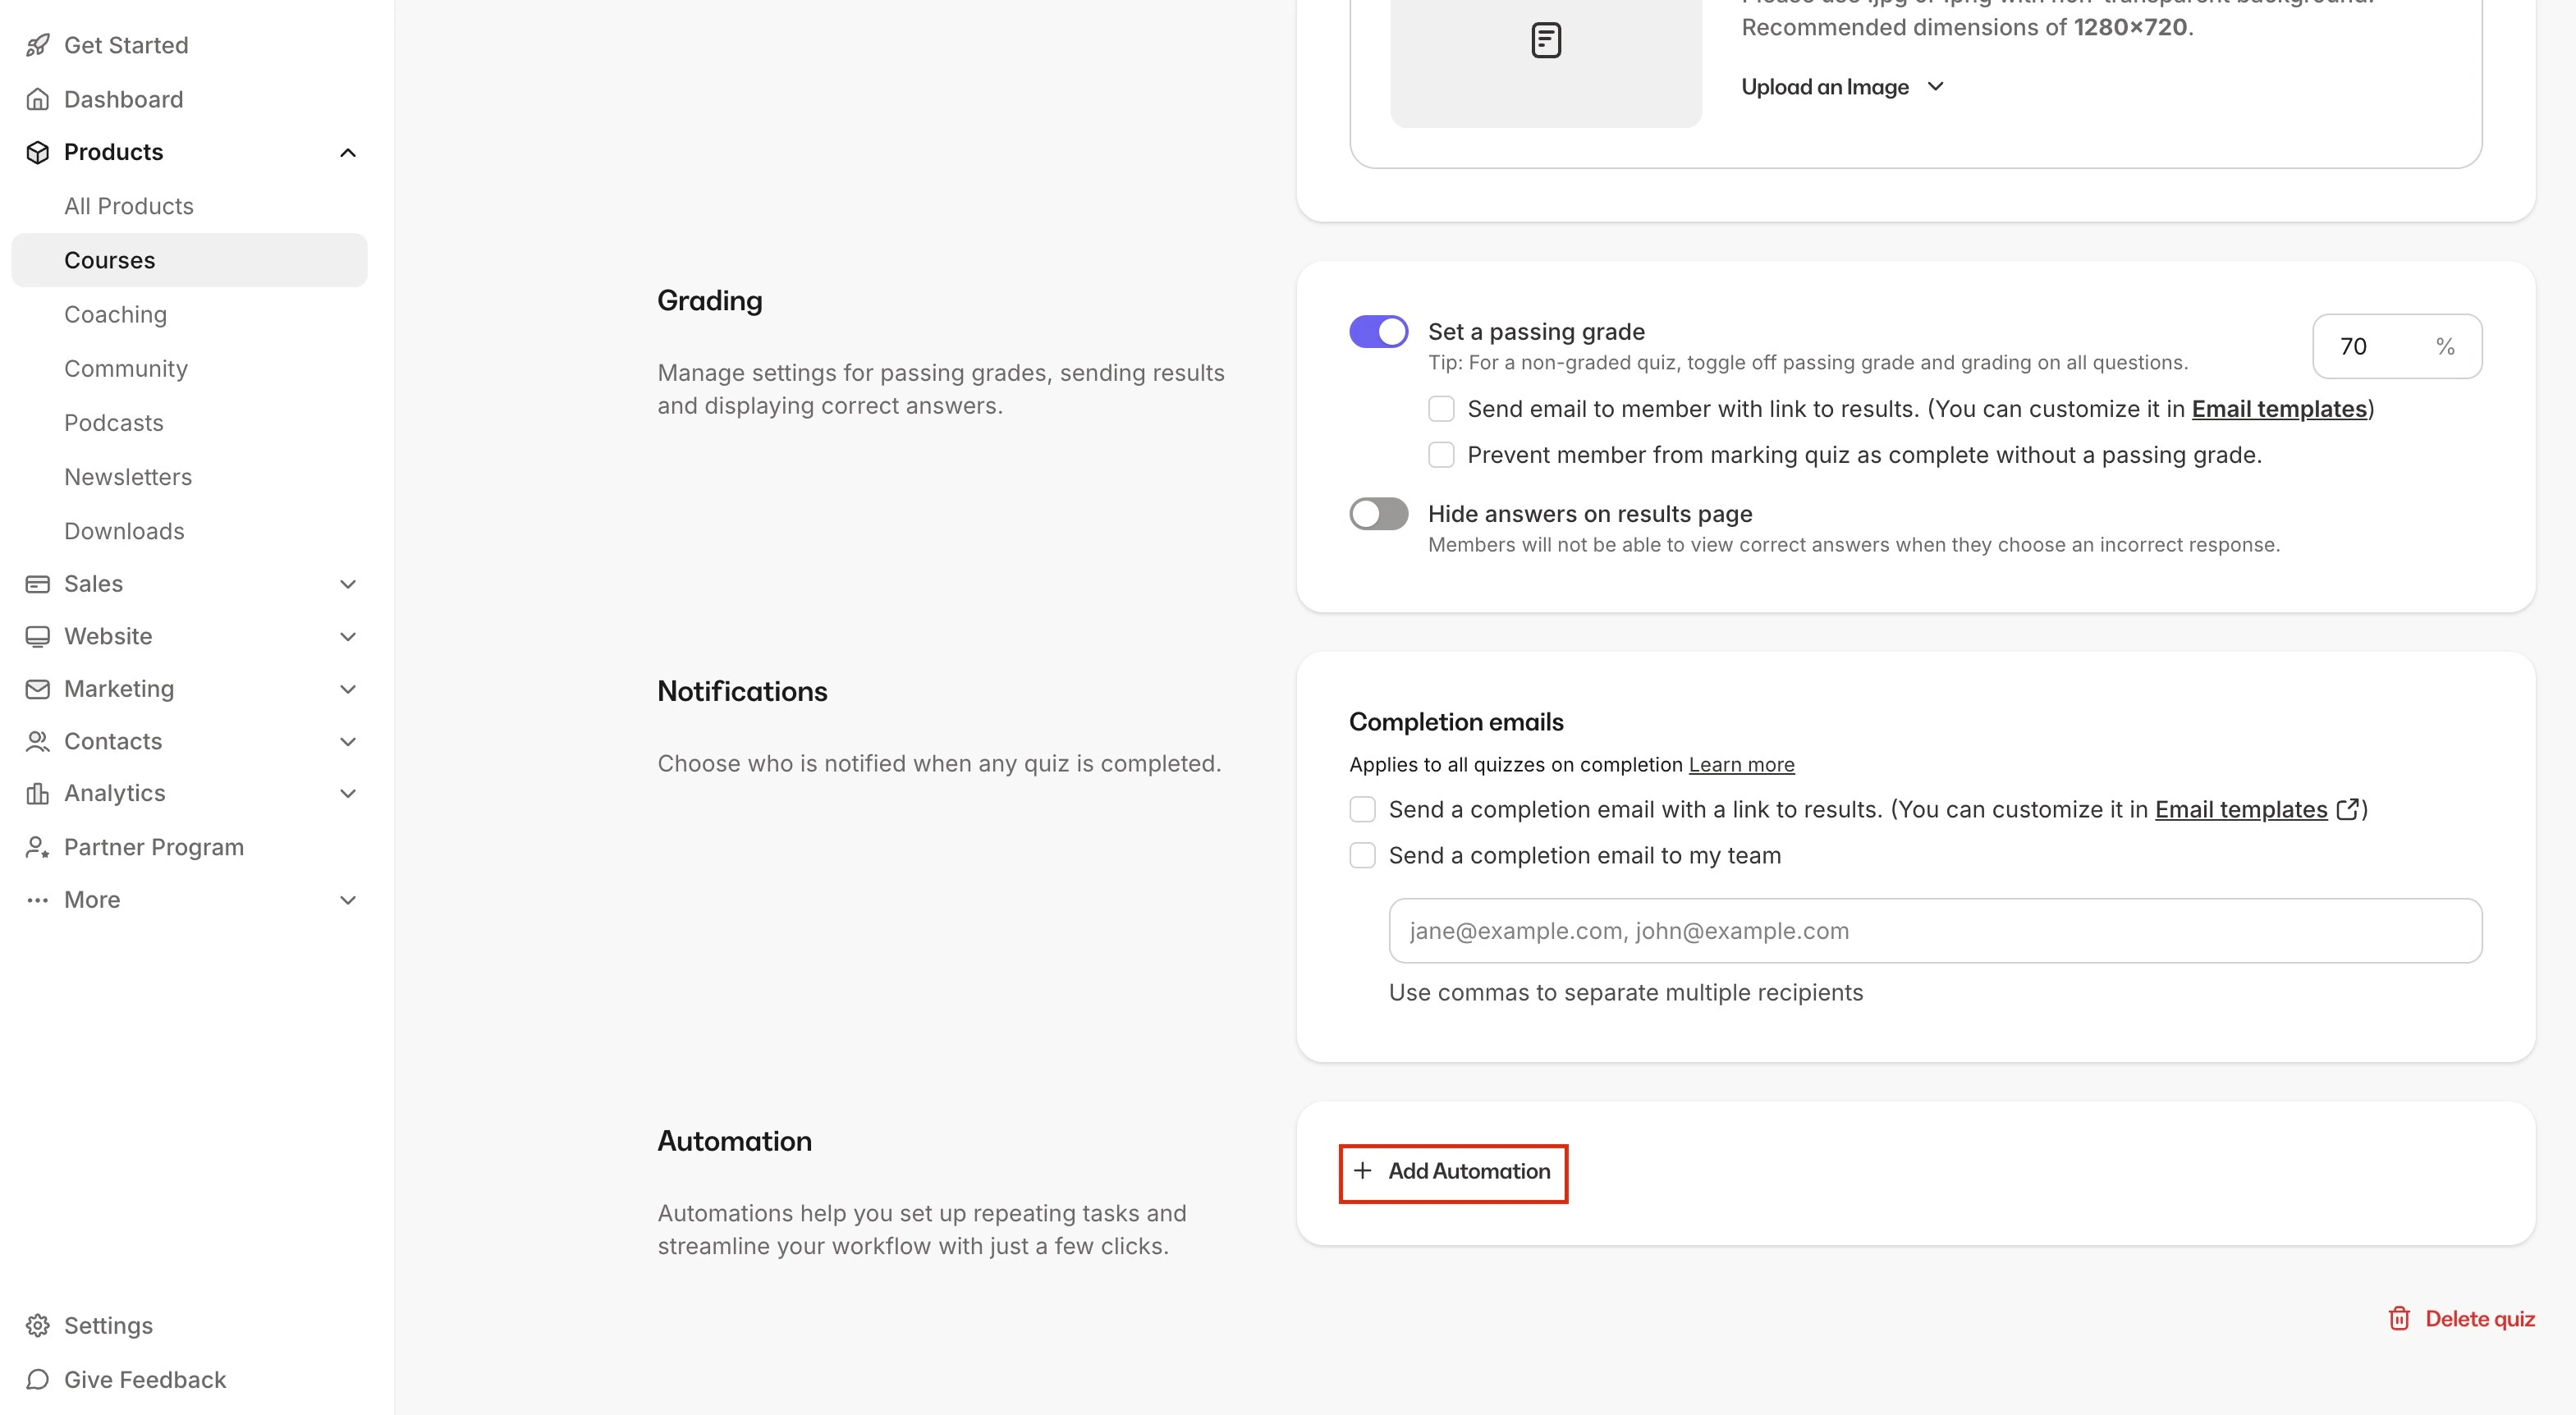
### Add an Automation to a Quiz
1. Open the **Products** tab from the Dashboard.
2. Select **Courses**.
3. Create a new Course or edit a **Quiz** in an existing Course.
4. Inside the Quiz Editor, select **Settings**.
5. Click **+ Add Automation**.
6. Create your Automation as desired.
[Learn more about Course Lessons](/articles/products/products-overview/kajabi-products-overview)
### Add an Automation to a Quiz
1. Open the **Products** tab from the Dashboard.
2. Select **Courses**.
3. Create a new Course or edit a **Quiz** in an existing Course.
4. Inside the Quiz Editor, select **Settings**.
5. Click **+ Add Automation**.
6. Create your Automation as desired.
 [Learn more about Quizzes](/articles/products/courses/course-quizzes)
### Add an Automation to a Certificate of Completion
1. Open the **Products** tab from the Dashboard.
2. Select **Courses**.
3. Create a new Course or edit a **Certificate** in an existing Course.
4. From the Course Outline, select **Certificates**.
5. If you haven't yet, create and save your Certificate of Completion (you won't see the Automations settings until after you've saved the Certificate).
6. Click **Add An Automation**.
7. Create your Automation as desired.
[Learn more about Quizzes](/articles/products/courses/course-quizzes)
### Add an Automation to a Certificate of Completion
1. Open the **Products** tab from the Dashboard.
2. Select **Courses**.
3. Create a new Course or edit a **Certificate** in an existing Course.
4. From the Course Outline, select **Certificates**.
5. If you haven't yet, create and save your Certificate of Completion (you won't see the Automations settings until after you've saved the Certificate).
6. Click **Add An Automation**.
7. Create your Automation as desired.
 [Learn about Certificates of Completion](/articles/products/courses/course-completion-certificates)
## Filter Automations
Narrow a long list of Automations using the filters above your **Automations** tab. Each one opens a dropdown, and a filter you apply stays on screen showing what you picked, so you can always see what is active.
**Note:** Automation filtering is rolling out gradually. If you do not see the filters on your **Automations** tab, it is not available on your account yet.
### Filter by trigger or action
1. Open the **Marketing** tab from your Dashboard.
2. Click **Automations**.
3. Click **Trigger** to filter by what starts an Automation, or **Action** to filter by what it does.
4. Choose a trigger or action type, then use the optional fields to narrow it to a specific item.
5. Click **Apply**.
What you picked takes the place of **Trigger** or **Action** in the filter row. Click it again to change it, then click **Apply**, or click **Clear filter** to remove it.
### Filter by status
Click **Status** and choose **Published**, **Draft**, or **Paused**. Status applies as soon as you choose it, and the filter then reads **Status: Published** so you can see which one is active. Only one status applies at a time, and **Clear status** removes it.
**Paused** appears only where [pausing an Automation](/articles/marketing/automations/whats-new-with-kajabi-automations#pause-and-resume-an-automation) is available.
### Add and clear filters
Once a filter is applied, two more options appear:
* **More filters** adds another trigger or action filter on top of the ones already applied
* **Clear all** removes every filter at once
[Learn about Certificates of Completion](/articles/products/courses/course-completion-certificates)
## Filter Automations
Narrow a long list of Automations using the filters above your **Automations** tab. Each one opens a dropdown, and a filter you apply stays on screen showing what you picked, so you can always see what is active.
**Note:** Automation filtering is rolling out gradually. If you do not see the filters on your **Automations** tab, it is not available on your account yet.
### Filter by trigger or action
1. Open the **Marketing** tab from your Dashboard.
2. Click **Automations**.
3. Click **Trigger** to filter by what starts an Automation, or **Action** to filter by what it does.
4. Choose a trigger or action type, then use the optional fields to narrow it to a specific item.
5. Click **Apply**.
What you picked takes the place of **Trigger** or **Action** in the filter row. Click it again to change it, then click **Apply**, or click **Clear filter** to remove it.
### Filter by status
Click **Status** and choose **Published**, **Draft**, or **Paused**. Status applies as soon as you choose it, and the filter then reads **Status: Published** so you can see which one is active. Only one status applies at a time, and **Clear status** removes it.
**Paused** appears only where [pausing an Automation](/articles/marketing/automations/whats-new-with-kajabi-automations#pause-and-resume-an-automation) is available.
### Add and clear filters
Once a filter is applied, two more options appear:
* **More filters** adds another trigger or action filter on top of the ones already applied
* **Clear all** removes every filter at once