> ## Documentation Index
> Fetch the complete documentation index at: https://developers.kajabi.com/llms.txt
> Use this file to discover all available pages before exploring further.
# Use a Wait Node with Automations
> Add delays between steps in your Automations for timed follow-ups, delayed coupon delivery, or drip-style sequences.
A **Wait Node** pauses your Automation for a set period before executing the next step. Use Wait Nodes for timed follow-ups, delayed coupon delivery, or drip-style sequences.
**Note:** Wait Nodes require the [visual Automation Builder](/articles/marketing/automations/whats-new-with-kajabi-automations). They are moving to every Kajabi plan, and that change is reaching accounts gradually. Until it reaches yours, **Wait** carries a **Premium** label unless you are on a [Growth plan or higher](https://kajabi.com/pricing).
## What the Wait Node does
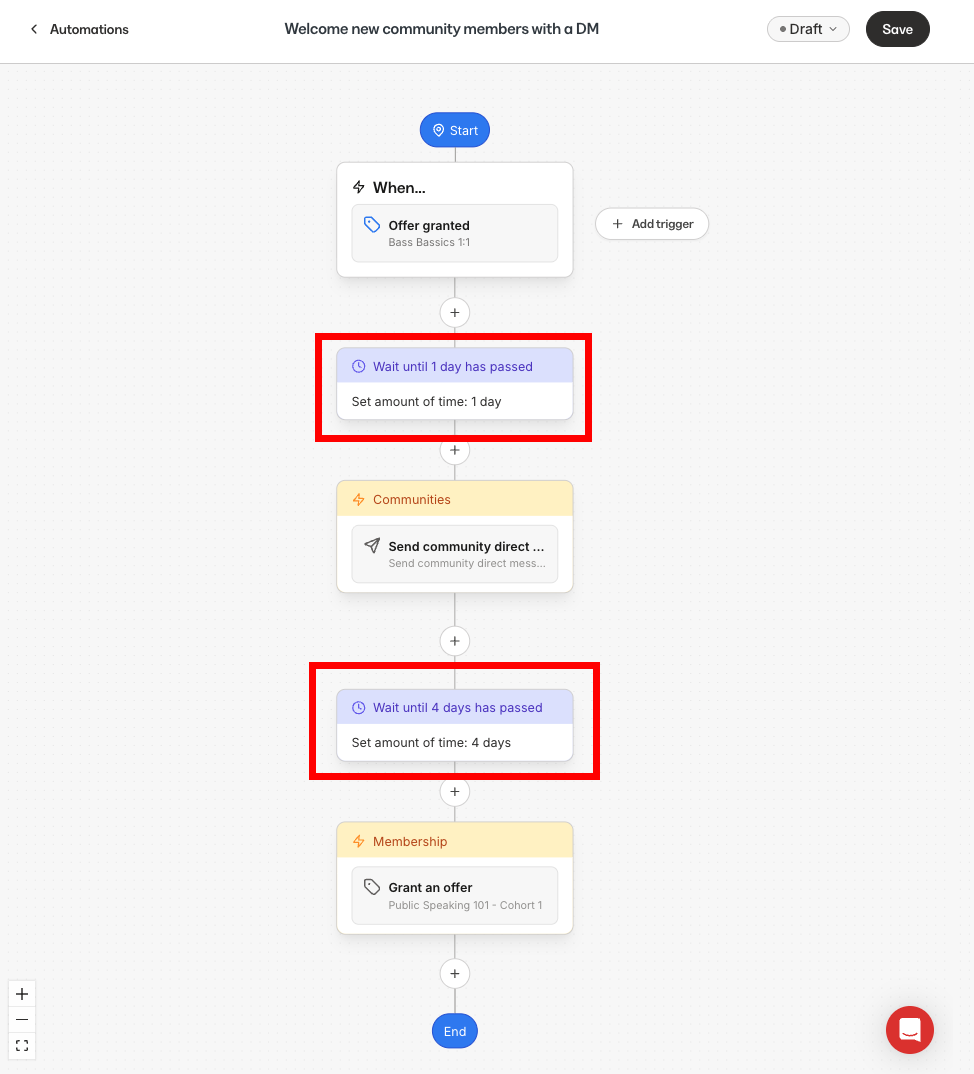
The Wait Node pauses your Automation for an amount of time. You can place it before or after any action and choose a **set amount of time**, **calendar date**, specific **day of the week**, or **time of day**:
 ## Add a Wait Node
You can add a Wait Node either **before** choosing an action or **after** the action is already in place.
### Add a Wait Node before selecting an action
1. From your Kajabi Dashboard, click **Marketing** > **Automations**.
2. Choose a preexisting Automation or create a new one.
3. Open your Automation and confirm a trigger is already added.
4. Click the **+** beneath the trigger.
5. Select **Wait**.
6. Configure the Wait Node:
* Give it a **Name** (optional). A name makes the Automation easier to read at a glance.
* Choose a **Wait until** option from the table below.
A Wait Node set to a specific time runs on your account's timezone unless you switch it to each recipient's own. Learn how to [choose which timezone a Wait Node uses](#choose-which-timezone-a-wait-node-uses).
| Wait until | What it does | Range |
| :- | :- | :- |
| **Set amount of time** | Delay the Automation by a set duration | 30 to 90 minutes, 1 to 24 hours, or 1 to 365 days |
| **Calendar date** | Wait for a specific date and time before the next step runs | Any future date |
| **Day of week** | Continue on the days of the week and time you choose | Any days |
| **Time of day** | Wait until a specific time of day before the next step runs | Any time |
7. The Wait Node appears in the workflow.
**Warning:** Once a **Calendar date** has passed, Automations using that Wait Node become outdated, and Contacts cannot complete the Automation flow.
### Add a Wait Node after selecting an action
1. Add an action to your Automation.
2. Click the **+** between the trigger and the action.
3. Select **Wait**.
4. Choose a **Wait until** option (set amount of time, calendar date, day of week, time of day).
5. Save your changes. The Wait Node is added between the trigger and the action.
## Choose which timezone a Wait Node uses
A Wait Node that lands on a wall-clock time can run on one of two clocks. On your account's timezone, 9:00 AM is a single moment worldwide, so it reaches Sydney and London at the same time. On each recipient's timezone, 9:00 AM means 9:00 AM wherever each contact is.
This choice applies to the **Calendar date**, **Day of week**, and **Time of day** wait types. **Set amount of time** is the same length of time everywhere, so it has no timezone setting.
1. Open the Wait Node and choose **Calendar date**, **Day of week**, or **Time of day**.
2. Select **Use each recipient's timezone**.
3. Save your changes. The step is marked **per recipient** on the canvas.
Kajabi uses a contact's own timezone when it knows one, and your account's timezone for everyone else.
**Note:** Per-recipient timing is rolling out. If you do not see **Use each recipient's timezone** on a Wait Node, it is not available on your account yet.
### How Kajabi learns a contact's timezone
Kajabi records a timezone for a contact when they submit one of your Forms, reading it from the browser they filled the Form in on. Coverage builds up as people interact with you rather than all at once: a contact you already have picks up a timezone the next time they submit a Form, and a later submission refreshes it. Your existing list is not filled in all at once, so the longer this has been running before you use per-recipient timing, the more of your list it covers.
Which timezone a Wait Node uses depends on what Kajabi knows about that contact:
* A contact who is also a member of your site uses the [timezone on their own account](/articles/contacts/manage-your-contacts/customer-update-of-customer-settings), which takes precedence over anything captured from a Form
* Anyone who has bought from you already has a timezone recorded from checkout, so your buyers are covered without submitting a Form
* A contact with no timezone on record runs on your account's timezone, so nobody is left unscheduled
* A Form that uses double opt-in does not record a timezone, and neither does a submission that arrives through Zapier, which keeps an integration's location from being recorded as the contact's
**Note:** Timezone capture is rolling out separately from per-recipient timing, so one may reach your account before the other. Capture on its own does not change when your Automations send.
## FAQs
### Can the Wait Node be renamed?
Yes. You can rename the Wait Node for clarity at any time.
### Does the Wait Node block publishing?
A Wait Node prevents publishing only if no action follows it. If this happens, you'll see a warning before publishing.
### Can I add multiple Wait Nodes?
Yes. Multiple Wait Nodes can be added throughout the Automation to create the timing you need.
## Add a Wait Node
You can add a Wait Node either **before** choosing an action or **after** the action is already in place.
### Add a Wait Node before selecting an action
1. From your Kajabi Dashboard, click **Marketing** > **Automations**.
2. Choose a preexisting Automation or create a new one.
3. Open your Automation and confirm a trigger is already added.
4. Click the **+** beneath the trigger.
5. Select **Wait**.
6. Configure the Wait Node:
* Give it a **Name** (optional). A name makes the Automation easier to read at a glance.
* Choose a **Wait until** option from the table below.
A Wait Node set to a specific time runs on your account's timezone unless you switch it to each recipient's own. Learn how to [choose which timezone a Wait Node uses](#choose-which-timezone-a-wait-node-uses).
| Wait until | What it does | Range |
| :- | :- | :- |
| **Set amount of time** | Delay the Automation by a set duration | 30 to 90 minutes, 1 to 24 hours, or 1 to 365 days |
| **Calendar date** | Wait for a specific date and time before the next step runs | Any future date |
| **Day of week** | Continue on the days of the week and time you choose | Any days |
| **Time of day** | Wait until a specific time of day before the next step runs | Any time |
7. The Wait Node appears in the workflow.
**Warning:** Once a **Calendar date** has passed, Automations using that Wait Node become outdated, and Contacts cannot complete the Automation flow.
### Add a Wait Node after selecting an action
1. Add an action to your Automation.
2. Click the **+** between the trigger and the action.
3. Select **Wait**.
4. Choose a **Wait until** option (set amount of time, calendar date, day of week, time of day).
5. Save your changes. The Wait Node is added between the trigger and the action.
## Choose which timezone a Wait Node uses
A Wait Node that lands on a wall-clock time can run on one of two clocks. On your account's timezone, 9:00 AM is a single moment worldwide, so it reaches Sydney and London at the same time. On each recipient's timezone, 9:00 AM means 9:00 AM wherever each contact is.
This choice applies to the **Calendar date**, **Day of week**, and **Time of day** wait types. **Set amount of time** is the same length of time everywhere, so it has no timezone setting.
1. Open the Wait Node and choose **Calendar date**, **Day of week**, or **Time of day**.
2. Select **Use each recipient's timezone**.
3. Save your changes. The step is marked **per recipient** on the canvas.
Kajabi uses a contact's own timezone when it knows one, and your account's timezone for everyone else.
**Note:** Per-recipient timing is rolling out. If you do not see **Use each recipient's timezone** on a Wait Node, it is not available on your account yet.
### How Kajabi learns a contact's timezone
Kajabi records a timezone for a contact when they submit one of your Forms, reading it from the browser they filled the Form in on. Coverage builds up as people interact with you rather than all at once: a contact you already have picks up a timezone the next time they submit a Form, and a later submission refreshes it. Your existing list is not filled in all at once, so the longer this has been running before you use per-recipient timing, the more of your list it covers.
Which timezone a Wait Node uses depends on what Kajabi knows about that contact:
* A contact who is also a member of your site uses the [timezone on their own account](/articles/contacts/manage-your-contacts/customer-update-of-customer-settings), which takes precedence over anything captured from a Form
* Anyone who has bought from you already has a timezone recorded from checkout, so your buyers are covered without submitting a Form
* A contact with no timezone on record runs on your account's timezone, so nobody is left unscheduled
* A Form that uses double opt-in does not record a timezone, and neither does a submission that arrives through Zapier, which keeps an integration's location from being recorded as the contact's
**Note:** Timezone capture is rolling out separately from per-recipient timing, so one may reach your account before the other. Capture on its own does not change when your Automations send.
## FAQs
### Can the Wait Node be renamed?
Yes. You can rename the Wait Node for clarity at any time.
### Does the Wait Node block publishing?
A Wait Node prevents publishing only if no action follows it. If this happens, you'll see a warning before publishing.
### Can I add multiple Wait Nodes?
Yes. Multiple Wait Nodes can be added throughout the Automation to create the timing you need.