> ## Documentation Index
> Fetch the complete documentation index at: https://developers.kajabi.com/llms.txt
> Use this file to discover all available pages before exploring further.
# Explore the upgraded Automations experience
> Understand what changed with the visual Automation Builder and take full advantage of the latest enhancements.
With the upgraded **Automations** experience, Kajabi offers a more powerful, flexible, and visual way to build Automations across your business. Explore what changed and how to take full advantage of the enhancements.
## Banner and upgrade prompt
When accessing Automations, you'll see a banner inviting you to explore the enhanced version. Click **Explore and update**, then click **Update** in the confirmation window to begin:
**Note:** Once upgraded, the Automations experience fully replaces the previous version. Rollbacks are not supported.
## What to expect after upgrading
### Visual Automations replace Automation rules
Upgrading does not delete your Automations. Each Automation rule you already have is rebuilt as its own visual Automation, keeping the same trigger, the same action, and any conditions you set on it.
The rebuild starts on its own once you confirm the upgrade, and it needs no further step from you. Your existing Automations keep running while it happens, but creating and editing Automations is paused until it finishes, which may take a few minutes.
* Automation rules no longer appear in their previous format.
* If your current Automations share a trigger, they will not be combined into a single Automation. They appear as separate Automations.
* For example, if you currently have one Automation that tags a contact and a separate Automation that sends an email when a form is submitted, those remain as two separate Automations after the upgrade.
* Automations are created using a visual editor with nodes and branches.
Once upgraded, you can build in ways a single Automation rule could not: put several **Then** actions in order on one canvas, and set each Automation to **Draft**, **Published**, or **Paused**. Branches and starting one Automation from more than one trigger are part of advanced Automations, so whether you can add them depends on your Kajabi plan. Wait steps are moving to every plan. When one is not included in your plan, it still appears in the editor with a **Premium** label.
**Note:** Review your Automations once the upgrade finishes and confirm each one shows as **Published**. An Automation that points to something you have since archived or deleted, such as a Quiz in an archived Product, may arrive as a **Draft** or may not carry over.
### Automation Blueprints
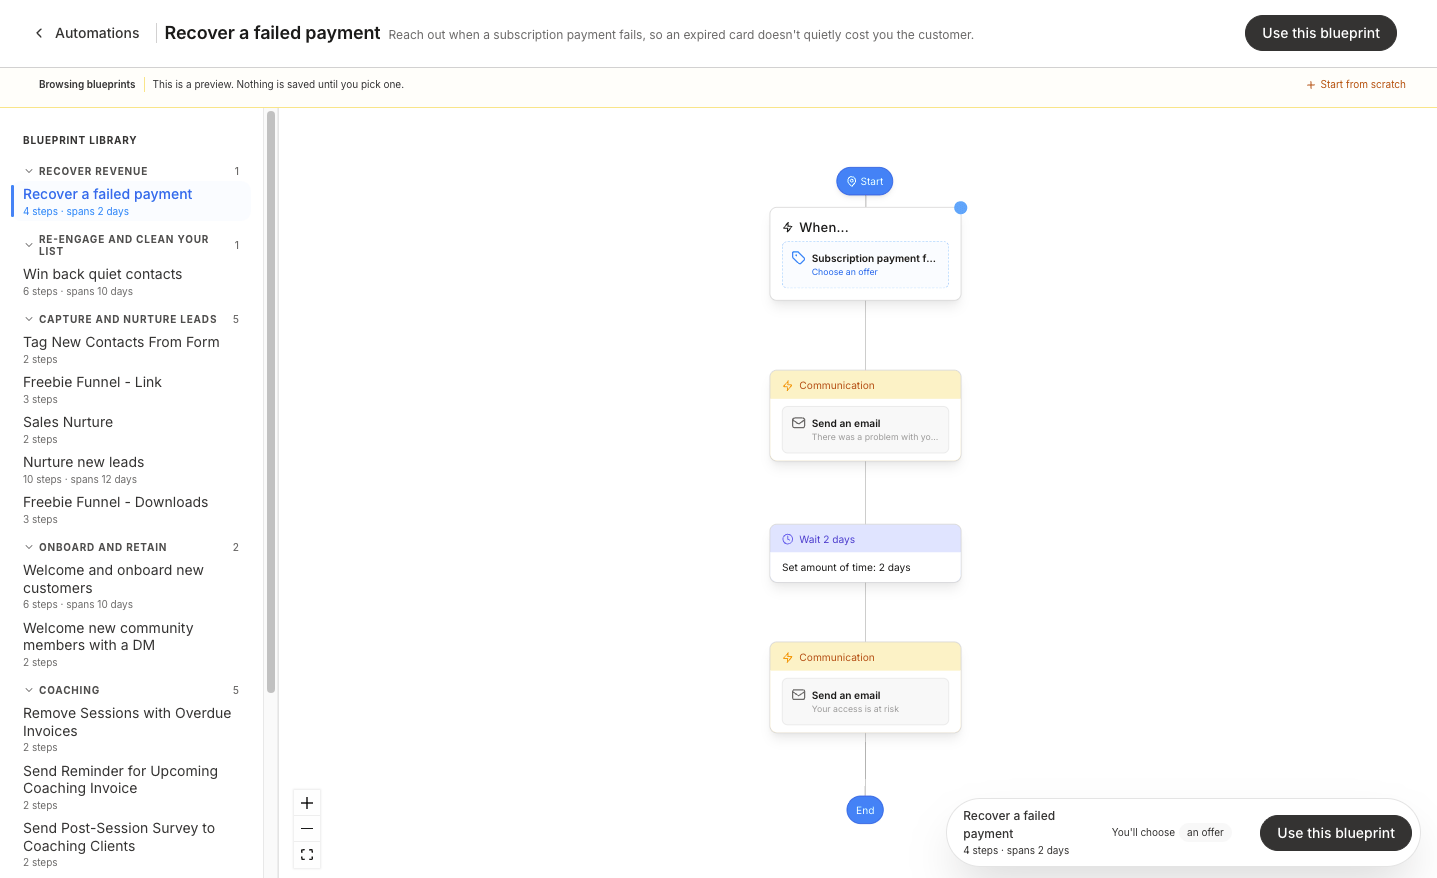
When you create an Automation, you'll see **Automation Blueprints**. This is where you begin building your Automation using a templated set of steps, or start from scratch. Clicking **New automation** takes you straight to the builder with a **Blueprint library** alongside it, so you can see each Blueprint laid out as a flow before choosing one.
A banner reads **Browsing blueprints** while you look, with the reminder that "This is a preview. Nothing is saved until you pick one." You cannot edit the flow while you are previewing it, and the library always has one Blueprint selected, so you never arrive at a blank canvas.
 #### Choose a Blueprint
1. Open the **Marketing** tab from your Dashboard.
2. Click **Automations**, then click **New automation**. If you have no Automations yet, **Get started** opens the same view.
3. Select a Blueprint from the **Blueprint library** to preview it on the canvas.
4. Click **Use this blueprint** to start building with it, or **Start from scratch** to open an empty canvas.
Either choice hands you an editable canvas rather than a finished Automation. Nothing is saved until you save it yourself.
The **Blueprint library** groups Blueprints by what you are trying to achieve, under **Recover revenue**, **Re-engage and clean your list**, **Capture and nurture leads**, **Onboard and retain**, **Coaching**, and **Social messaging**. Each heading shows how many Blueprints it holds. Groups that suit your site open automatically, while ones that do not apply, such as **Coaching** on a site with no coaching Product, move to the bottom and start collapsed. Under each Blueprint name you'll see its shape at a glance, such as *6 steps · spans 10 days*. Where a Blueprint needs you to supply something, such as an Offer or a Tag, the preview lists it under **You'll choose**.
Four Blueprints come with this view:
* **Recover a failed payment** - Reach out when a subscription payment fails, so an expired card doesn't quietly cost you the customer
* **Win back quiet contacts** - Give inactive contacts a clear chance to come back, then tag the ones who stay quiet so you can clean your list
* **Welcome and onboard new customers** - Walk new customers through their first two weeks, then ask for a review while the experience is fresh
* **Nurture new leads** - Nurture new leads with a five email sequence over two weeks, ending at your sales page
A Blueprint your account cannot use yet offers **Upgrade to use** in place of **Use this blueprint**, and the preview is replaced by a note naming what it needs, such as advanced automations or Universal Inbox. All four of these Blueprints use Wait Nodes, so they need Advanced Automations until [Wait Nodes reach your plan](/articles/marketing/automations/how-to-use-a-wait-node-with-automations).
**Note:** The **Blueprint library** is rolling out. If you do not see it when you click **New automation**, it is not available on your account yet, and neither are the four Blueprints above.
### Automation basics
#### Triggers and actions (When / Then)
* Each Automation starts with a **When** trigger event.
* You can then add one or more **Then** actions that follow.
* The system allows multiple **Then** actions for a single trigger. Previously, only one **Then** action was allowed per Automation.
#### Draft, publish, and pause status
* Automations are not automatically published when created.
* You can set the Automation to **Draft** or **Published** when editing.
* A published Automation can also be set to **Paused**, which holds it in place without unpublishing it.
* Automations must be published to run:
#### Choose a Blueprint
1. Open the **Marketing** tab from your Dashboard.
2. Click **Automations**, then click **New automation**. If you have no Automations yet, **Get started** opens the same view.
3. Select a Blueprint from the **Blueprint library** to preview it on the canvas.
4. Click **Use this blueprint** to start building with it, or **Start from scratch** to open an empty canvas.
Either choice hands you an editable canvas rather than a finished Automation. Nothing is saved until you save it yourself.
The **Blueprint library** groups Blueprints by what you are trying to achieve, under **Recover revenue**, **Re-engage and clean your list**, **Capture and nurture leads**, **Onboard and retain**, **Coaching**, and **Social messaging**. Each heading shows how many Blueprints it holds. Groups that suit your site open automatically, while ones that do not apply, such as **Coaching** on a site with no coaching Product, move to the bottom and start collapsed. Under each Blueprint name you'll see its shape at a glance, such as *6 steps · spans 10 days*. Where a Blueprint needs you to supply something, such as an Offer or a Tag, the preview lists it under **You'll choose**.
Four Blueprints come with this view:
* **Recover a failed payment** - Reach out when a subscription payment fails, so an expired card doesn't quietly cost you the customer
* **Win back quiet contacts** - Give inactive contacts a clear chance to come back, then tag the ones who stay quiet so you can clean your list
* **Welcome and onboard new customers** - Walk new customers through their first two weeks, then ask for a review while the experience is fresh
* **Nurture new leads** - Nurture new leads with a five email sequence over two weeks, ending at your sales page
A Blueprint your account cannot use yet offers **Upgrade to use** in place of **Use this blueprint**, and the preview is replaced by a note naming what it needs, such as advanced automations or Universal Inbox. All four of these Blueprints use Wait Nodes, so they need Advanced Automations until [Wait Nodes reach your plan](/articles/marketing/automations/how-to-use-a-wait-node-with-automations).
**Note:** The **Blueprint library** is rolling out. If you do not see it when you click **New automation**, it is not available on your account yet, and neither are the four Blueprints above.
### Automation basics
#### Triggers and actions (When / Then)
* Each Automation starts with a **When** trigger event.
* You can then add one or more **Then** actions that follow.
* The system allows multiple **Then** actions for a single trigger. Previously, only one **Then** action was allowed per Automation.
#### Draft, publish, and pause status
* Automations are not automatically published when created.
* You can set the Automation to **Draft** or **Published** when editing.
* A published Automation can also be set to **Paused**, which holds it in place without unpublishing it.
* Automations must be published to run:
If an Automation contains an error or is missing information, a **Publishing Unavailable** message appears.
Possible errors:
* Must have at least one lead node
* Must have at least one action node
* Email action limit reached
**Paused** holds a published Automation in place without unpublishing it. It stops sending, but it keeps collecting Contacts, who wait at the start until you resume. That is what separates it from **Draft**, which collects nobody. **Draft** is not offered while an Automation is paused, so resume it first if you want to unpublish it. A paused Automation carries a **Paused** status in the **Automations** list, where you can also filter by it. [Learn how to pause and resume an Automation](#pause-and-resume-an-automation)
Individual **Send an email** steps also carry their own Draft or Published status, so a published Automation can still contain an email step that is not yet sending. [Learn how to publish or draft an email step](understanding-automation-components#publish-or-draft-an-email-step)
## Features
### Enhanced Automation editor
* **Search bar:** Find Automations quickly by name or keyword.
* **Custom naming:** Organize your Automations with clear, descriptive names.
* **Total Enrolled:** See how many times the Automation has run.
* **Icon tooltips:** Hover over icons in the editor for helpful explanations.
* **Editable When text:** Modify trigger names directly in the editor.
* **Remaining members:** A fallback path when no conditions in a branch are met.
* **Remove Branch Warnings:** A confirmation appears before deleting branches.
**Note:** Total Enrolled will not backfill with historical data.
### Branching logic
The Automations editor supports branching logic, allowing you to create conditional paths within your Automation. If a contact meets the conditions set in a branch, they follow that path. If not, they follow the **Remaining members** branch instead.
### Community Automations
Automations offers Community Automations Automation Blueprint has been added to the existing Automation Blueprints, with additional **Then** community actions also added.
The **Welcome Community Members with a DM** Automation Blueprint automatically sends a personalized message to Community members:
1. From the Kajabi Dashboard, click **Marketing** > **Automations**.
2. Select **+ New Automation**.
3. Within the pop-up, choose **Welcome Community Members with a DM**.
4. Customize the **When** trigger and click **Save**.
5. Customize the **message** that will be sent when triggered. Click **Save**.
6. (Optional) Choose a contact to send a test message to, then click **Send Test**.
7. Click **Publish** and **Save** the Automation to activate.
If you are starting from scratch or setting up a different Automation, the following **Then** actions are available:
* Send Community DM
* Add a member to a private channel
* Remove member from private channel
* Post in channel
### Pause and resume an Automation
Pausing holds a published Automation in place without unpublishing it, so you can stop sends during a launch, a mistake, or a quiet week and pick up where you left off. Nothing is lost while an Automation is paused.
While paused:
* Contacts who trigger the Automation are still collected. They are held at the start and begin when you resume. To stop collecting them, unpublish the Automation instead of pausing it, since **Draft** is not offered while an Automation is paused
* Contacts on a wait step stay there. Their timers keep counting, and they continue when you resume
* Contacts partway through a run of steps continue until they reach a wait step and hold there. If no wait step is ahead of them, they finish the Automation. Anything already sending is not recalled
To pause a published Automation:
1. Open the Automation, or find it in the **Automations** list.
2. Open the status dropdown and select **Paused**.
3. Review **Pause this automation?**, then click **Pause automation**.
A banner reads **This automation is paused** until you start it again, and the Automation shows a **Paused** status in the **Automations** list, where you can also filter by **Paused**.
To start it again, select **Published** from the status dropdown or click **Resume** on the banner, then click **Resume automation**. Contacts who triggered while paused start from the beginning, and contacts whose wait ended while paused continue to their next step. Both are released within about five minutes.
**Note:** Pausing is rolling out. If you do not see **Paused** in the status dropdown, it is not available on your account yet.
## Analytics mode
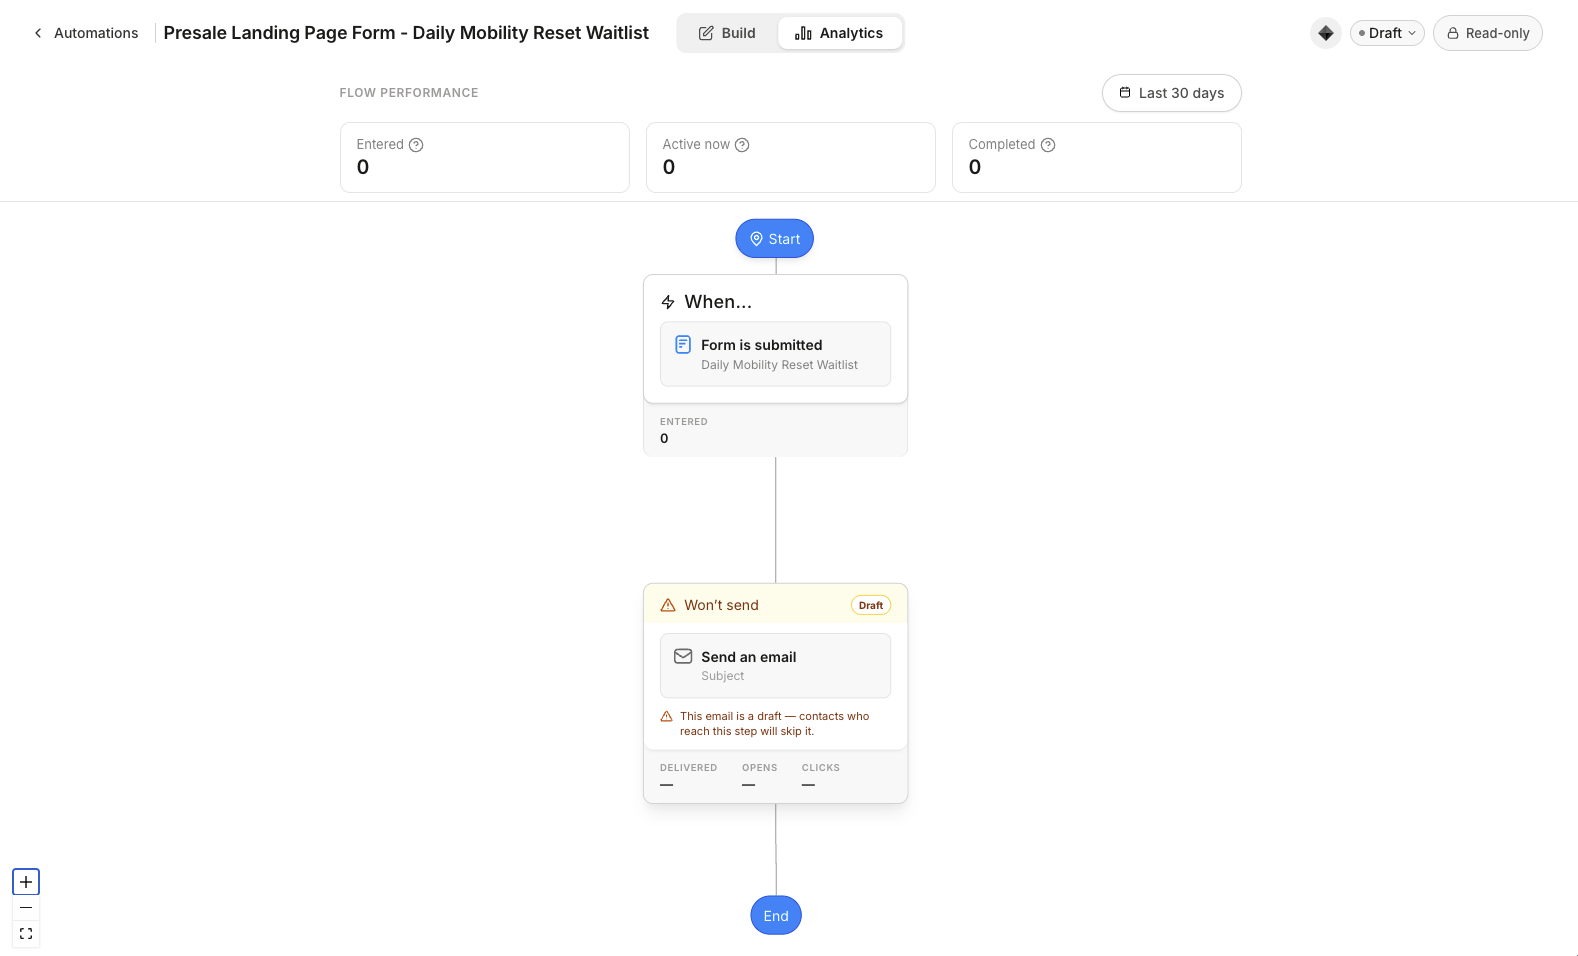
**Analytics** mode turns your Automation canvas into a performance view, so you can see how many Contacts moved through the flow and how each email performed without leaving the builder.
Use the **Build** and **Analytics** toggle at the top of the Automation to switch between them. **Build** is the editor you already use. **Analytics** is read-only: a **Read-only** label replaces the Save button, and editing stays off until you switch back to **Build**.
 **Note:** **Analytics** mode requires [upgrading to the visual Automation Builder](#what%E2%80%99s-changing), and it is also rolling out gradually on top of it. If you have upgraded but do not see the **Build** and **Analytics** toggle on your Automation, it is not available on your account yet.
### Set the date range
Every statistic on the canvas reads from one shared date range, so the flow numbers and the email numbers always describe the same window. The date range button next to **Flow performance** shows the range in use, and **Last 30 days** is the default.
1. Click the date range button next to **Flow performance**.
2. Choose a preset, or click a start date and an end date on the calendar to set your own range. The presets are **Today**, **Last 7 days**, **Last 30 days**, **Last month**, **This month**, **Last quarter**, **This quarter**, **This year**, **Last 12 months**, and **Year to date**.
3. Click **Apply**.
To close the picker without changing the range, click **Cancel**.
The picker also shows the date your Automation was created, since no Contact could enter the flow before then. Performance data is not backfilled. Emails sent before Analytics became available on your account are not counted.
### Read flow performance
The **Flow performance** strip above the canvas summarizes how Contacts moved through the whole Automation:
* **Entered** - How many times Contacts entered the Automation during the selected date range
* **Active now** - Contacts moving through the Automation right now
* **Completed** - How many times Contacts reached the end of the Automation during the selected date range
* **Exited** - How many times Contacts left the Automation early during the selected date range, because they matched an exit condition or their path was removed
**Note:** **Active now** is a live count of where Contacts are right now, so it does not change when you change the date range. **Entered** and **Completed** both follow the range you select, and they count each pass through the flow, so a Contact who enters through two triggers or re-enters later is counted each time.
Each trigger on the canvas also shows its own **Entered** count, which is useful when one Automation starts from several different triggers.
### Read email performance on the canvas
In **Analytics** mode, every **Send an email** step displays a compact stats strip directly on the canvas showing **Delivered**, **Opens**, and **Clicks**, so you can scan the whole flow at once. A step with nothing to report in the selected range shows a dash in place of each figure.
Canvas stats appear on the first 40 email steps in an Automation. If your Automation has more than that, open a step directly to see its performance.
### View a single email's report
Click any **Send an email** step in **Analytics** mode to open its full report, which includes:
* A delivery funnel covering **Sent**, **Delivered**, **Opened**, and **Clicked**, with each stage shown as a share of total sends
* A **Drop-off** breakdown listing **Unsuccessful** sends (bounced, failed, and dropped) and how many recipients **Didn't open** the email
* A delivered-over-time chart for the selected date range
* The number of Contacts who unsubscribed from, or reported, that email
When Kajabi has bot-filtered figures for an email, an **Exclude bot clicks** toggle appears on the report. Turn it on to filter automated link-scanner activity out of both **Opens** and **Clicks**. Security software runs these scanners against links before a recipient ever sees them.
### Automations with no email steps
An Automation with no email steps has nothing to report, so **Analytics** mode shows **No email steps yet**. Switch to **Build**, add a **Send an email** action, then return to **Analytics** to see its performance.
## Where to add Automations
Once upgraded, you can create Automations from multiple areas within Kajabi:
* The **Automations** page
* **Forms**
* **Offers**
* **Funnels** (Automations tab)
* **Courses**
* **Email Campaigns** (both Broadcasts and Sequences)
* **Events**
* **Quizzes**
* **Certificates of Completion**
**Note:** **Analytics** mode requires [upgrading to the visual Automation Builder](#what%E2%80%99s-changing), and it is also rolling out gradually on top of it. If you have upgraded but do not see the **Build** and **Analytics** toggle on your Automation, it is not available on your account yet.
### Set the date range
Every statistic on the canvas reads from one shared date range, so the flow numbers and the email numbers always describe the same window. The date range button next to **Flow performance** shows the range in use, and **Last 30 days** is the default.
1. Click the date range button next to **Flow performance**.
2. Choose a preset, or click a start date and an end date on the calendar to set your own range. The presets are **Today**, **Last 7 days**, **Last 30 days**, **Last month**, **This month**, **Last quarter**, **This quarter**, **This year**, **Last 12 months**, and **Year to date**.
3. Click **Apply**.
To close the picker without changing the range, click **Cancel**.
The picker also shows the date your Automation was created, since no Contact could enter the flow before then. Performance data is not backfilled. Emails sent before Analytics became available on your account are not counted.
### Read flow performance
The **Flow performance** strip above the canvas summarizes how Contacts moved through the whole Automation:
* **Entered** - How many times Contacts entered the Automation during the selected date range
* **Active now** - Contacts moving through the Automation right now
* **Completed** - How many times Contacts reached the end of the Automation during the selected date range
* **Exited** - How many times Contacts left the Automation early during the selected date range, because they matched an exit condition or their path was removed
**Note:** **Active now** is a live count of where Contacts are right now, so it does not change when you change the date range. **Entered** and **Completed** both follow the range you select, and they count each pass through the flow, so a Contact who enters through two triggers or re-enters later is counted each time.
Each trigger on the canvas also shows its own **Entered** count, which is useful when one Automation starts from several different triggers.
### Read email performance on the canvas
In **Analytics** mode, every **Send an email** step displays a compact stats strip directly on the canvas showing **Delivered**, **Opens**, and **Clicks**, so you can scan the whole flow at once. A step with nothing to report in the selected range shows a dash in place of each figure.
Canvas stats appear on the first 40 email steps in an Automation. If your Automation has more than that, open a step directly to see its performance.
### View a single email's report
Click any **Send an email** step in **Analytics** mode to open its full report, which includes:
* A delivery funnel covering **Sent**, **Delivered**, **Opened**, and **Clicked**, with each stage shown as a share of total sends
* A **Drop-off** breakdown listing **Unsuccessful** sends (bounced, failed, and dropped) and how many recipients **Didn't open** the email
* A delivered-over-time chart for the selected date range
* The number of Contacts who unsubscribed from, or reported, that email
When Kajabi has bot-filtered figures for an email, an **Exclude bot clicks** toggle appears on the report. Turn it on to filter automated link-scanner activity out of both **Opens** and **Clicks**. Security software runs these scanners against links before a recipient ever sees them.
### Automations with no email steps
An Automation with no email steps has nothing to report, so **Analytics** mode shows **No email steps yet**. Switch to **Build**, add a **Send an email** action, then return to **Analytics** to see its performance.
## Where to add Automations
Once upgraded, you can create Automations from multiple areas within Kajabi:
* The **Automations** page
* **Forms**
* **Offers**
* **Funnels** (Automations tab)
* **Courses**
* **Email Campaigns** (both Broadcasts and Sequences)
* **Events**
* **Quizzes**
* **Certificates of Completion**