> ## Documentation Index
> Fetch the complete documentation index at: https://developers.kajabi.com/llms.txt
> Use this file to discover all available pages before exploring further.
# Send receipts with Kajabi
> Customize, resend, and download purchase receipts in Kajabi, including your business address, receipt language, and refund receipts.
Send receipts after your customers purchase an Offer with **Kajabi Receipts**. Kajabi Receipts lets you send branded email receipts and customize what appears on them — including a **default message that shows on every receipt**, your business address, receipt title, and invoice numbering.
**Note:** Kajabi Receipts applies to purchase receipts (the email customers receive after buying an Offer via Kajabi Payments). If you're looking to edit the formal PDF invoice sent with Kajabi Payments, see [Create and manage invoices with Kajabi Payments](https://help.kajabi.com/articles/sales/kajabi-payments/invoicing-with-kajabi-payments).
If you choose to use Kajabi Receipts with a third-party payment provider like Stripe or PayPal, be sure to disable [receipts with Stripe](/articles/api-integrations/payment-integrations/how-to-send-a-receipt-in-stripe) or [PayPal](/articles/api-integrations/payment-integrations/how-do-i-send-a-receipt-with-paypal).
## Set up email receipts
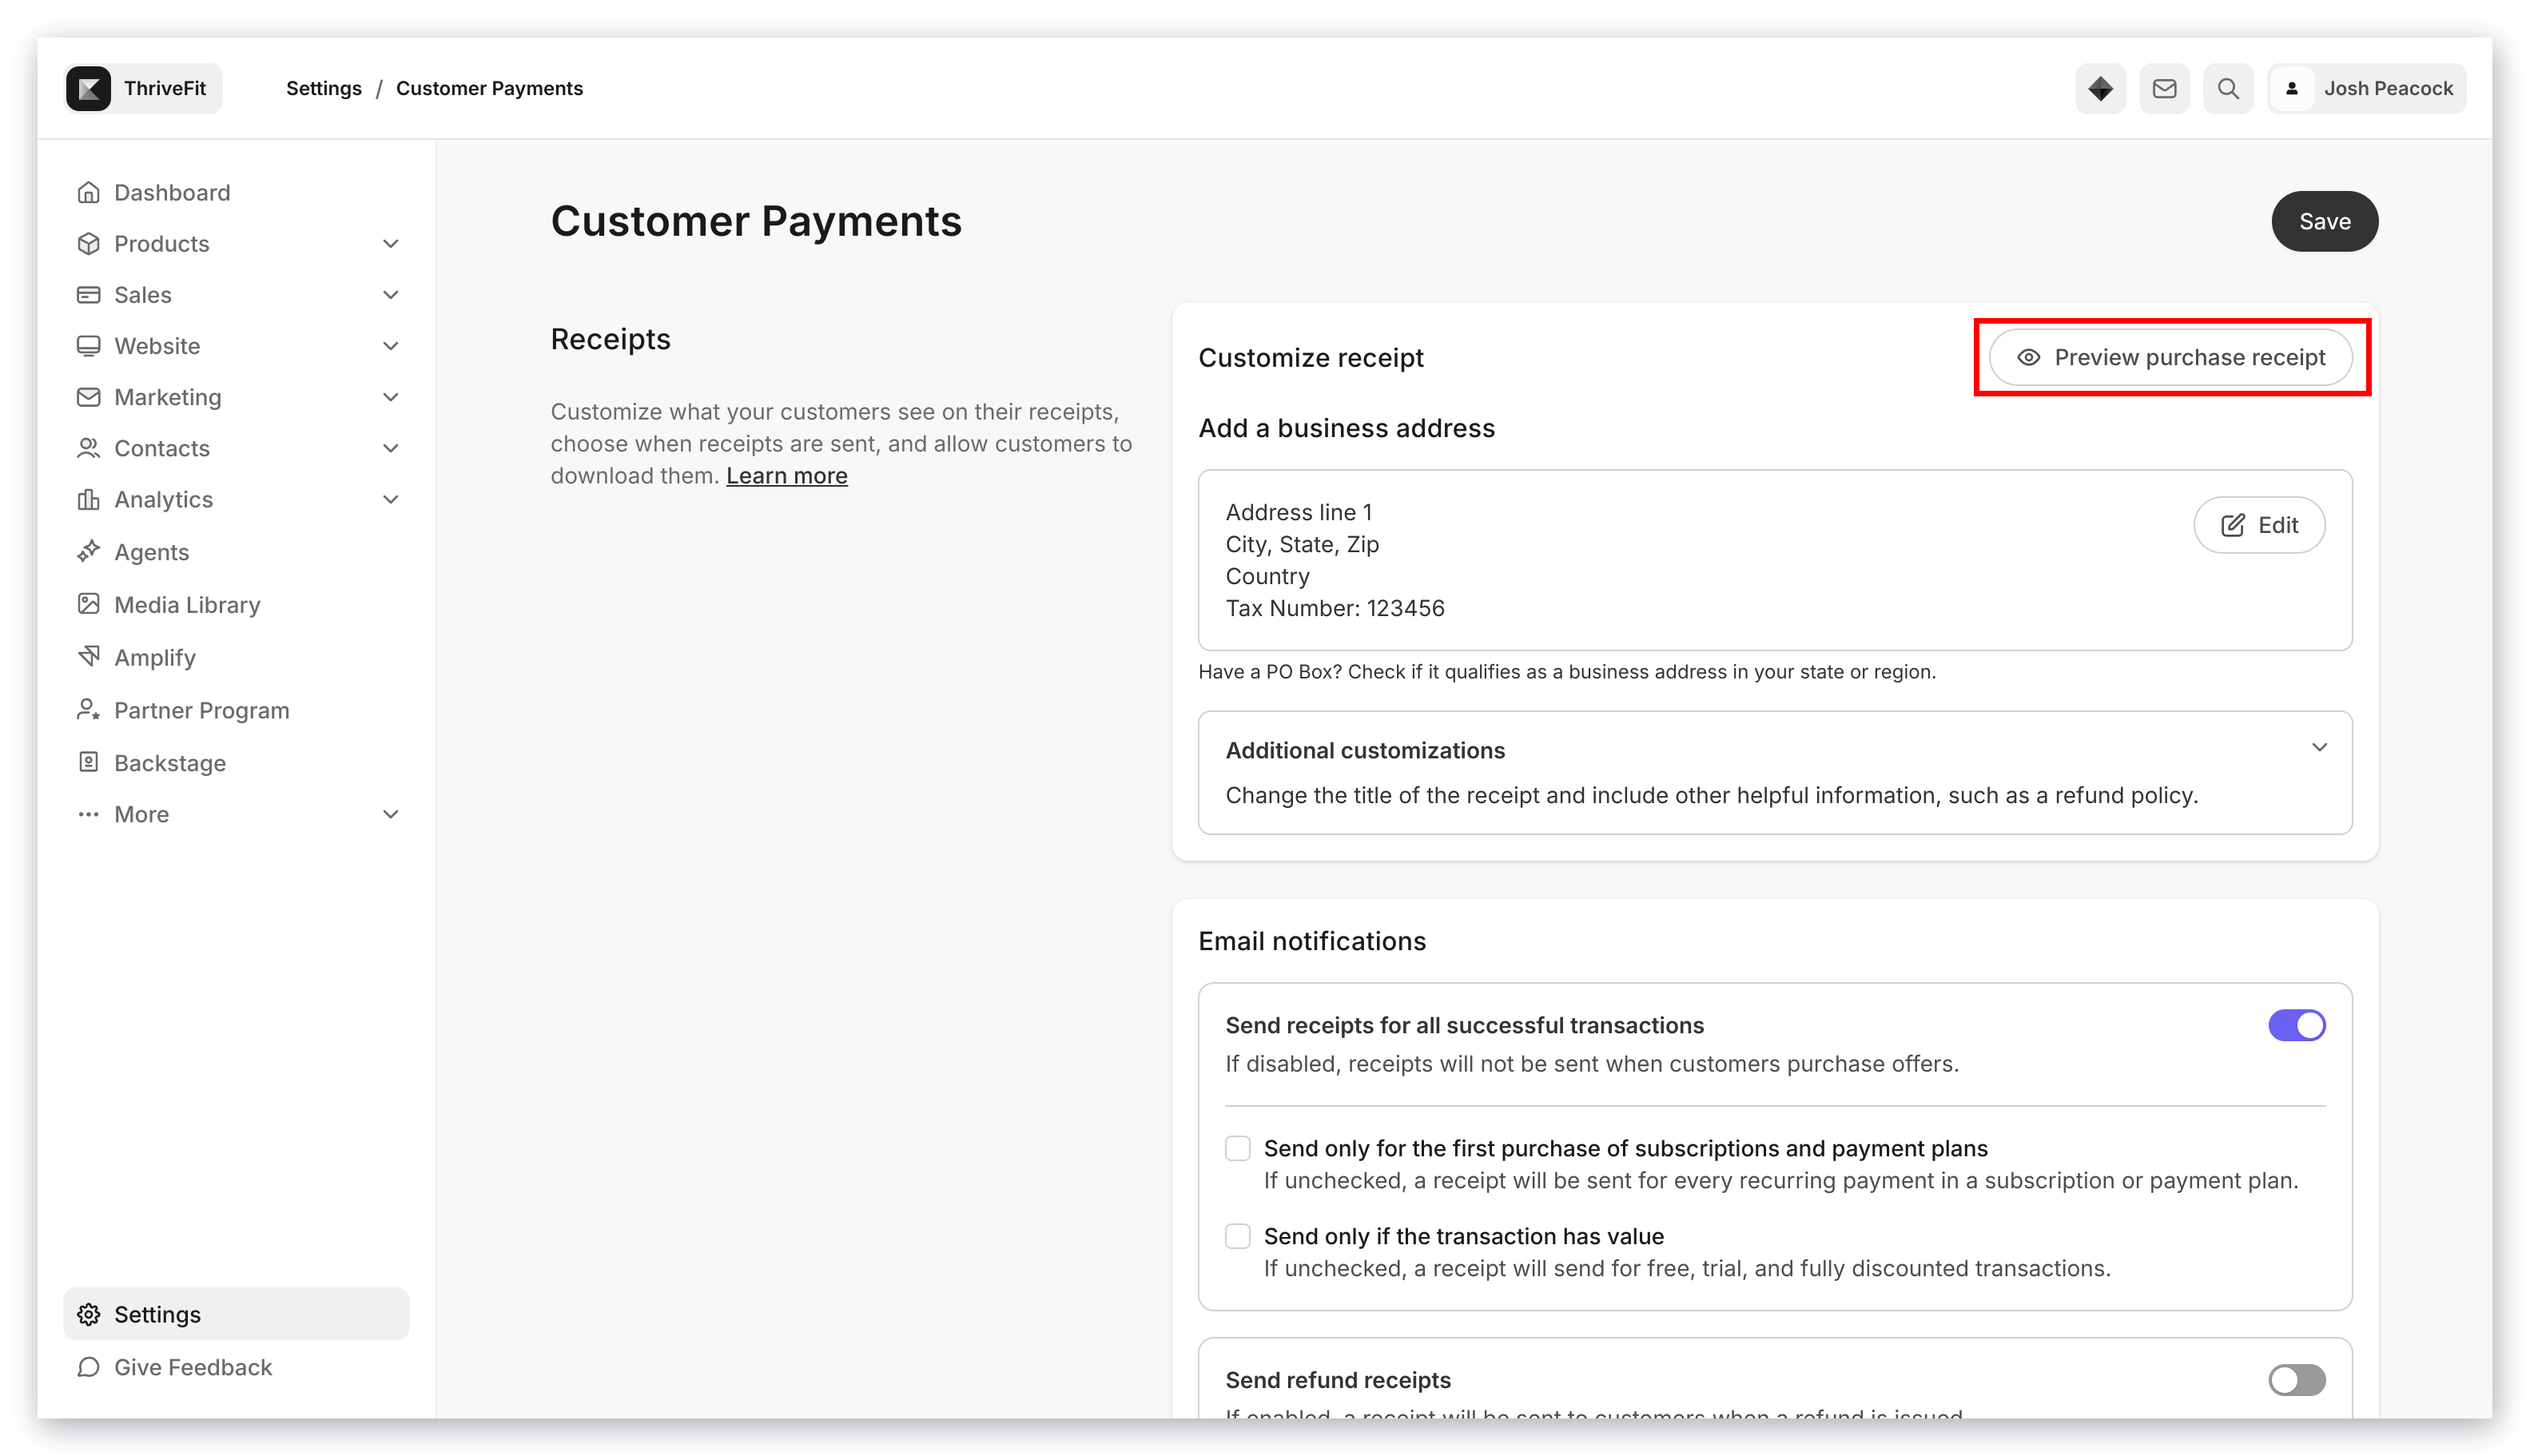
**Tip:** All receipt customizations — including your default message, business address, receipt title, and refund receipt settings — are managed in one place: **Settings → Customer Payments → Receipts**. Click **Save**, then **Preview purchase receipt** to review before any change goes live.
1. From the Dashboard, open the **Settings** tab.
2. Click **Customer Payments** under **Payment settings**.
3. Find the **Receipts** section.
### Customize receipts
**Business address (required)**: Your business address — including your **Tax number** — appears at the bottom of every receipt your customers receive. By default, this is your billing address from **Settings > Subscription & Billing > Billing**.
To use a different address just for receipts, click **Edit** next to **Add a business address**, select **Custom business address**, and enter the address you want to show instead. This only changes what appears on receipts — it does not change your Kajabi subscription billing details.
**Note:** Your [Marketing Settings address](/articles/marketing/email-campaigns/how-to-customize-your-marketing-settings) is copied from your billing address only once, when your site is created. Editing Marketing Settings afterward never updates your receipts — to change your receipt address, edit it in **Settings > Customer Payments > Receipts**, or [update your billing address](/articles/account-settings/billing/how-to-update-billing-details) if you want the default to change too.
**Additional customizations (optional)**:
* **Receipt title**: Choose a title for the top of your receipt. If left blank, this will default to "Purchase Confirmation".
* **Custom message** *(default note on every receipt)*: Add a message that appears on all purchase receipts automatically — for example, your refund policy, support contact, or a thank-you note. This is the field to use if you want every customer receipt to include the same note after an online purchase.
* **Next invoice number**: You can only increase the next invoice number. If you try to decrease it from its current number, you will receive an error.
Click **Save**, then **Preview purchase receipt** to review your changes.
 ### Email notifications
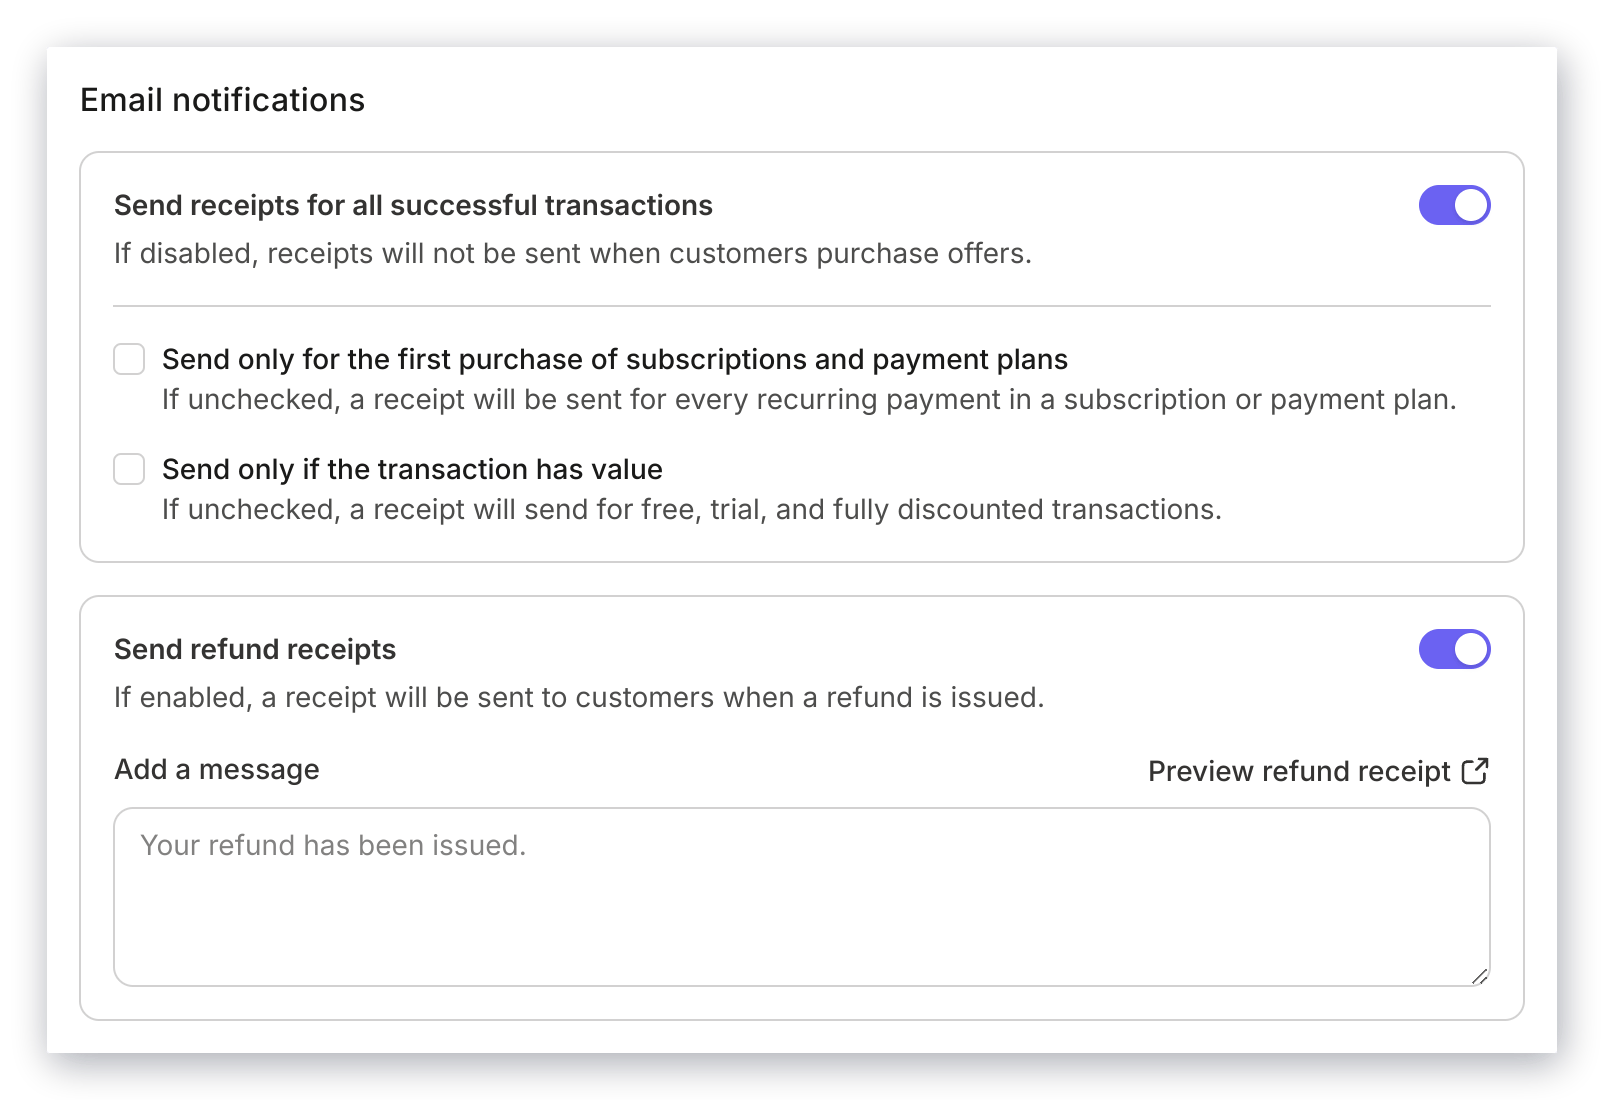
Choose if and when you want to send receipts for successful transactions under **Email notifications:**
* **Send receipts for all successful transactions**: Toggle this on to email a receipt for every successful transaction.
* **Send only for the first purchase of subscriptions and payment plans**: Only send a receipt for the initial charge on Offers with recurring billing (i.e., [subscriptions](/articles/sales/offers/how-to-create-a-subscription-offer) and [payment plans](/articles/sales/offers/create-a-payment-plan-offer)).
* **Send only if the transaction has value**: Skip sending a receipt for free, trial, or fully discounted transactions.
* **Send refund receipts**: Toggle this on to email customers a receipt when you issue a refund. You can also add a custom message to your refund receipt emails here.
### Email notifications
Choose if and when you want to send receipts for successful transactions under **Email notifications:**
* **Send receipts for all successful transactions**: Toggle this on to email a receipt for every successful transaction.
* **Send only for the first purchase of subscriptions and payment plans**: Only send a receipt for the initial charge on Offers with recurring billing (i.e., [subscriptions](/articles/sales/offers/how-to-create-a-subscription-offer) and [payment plans](/articles/sales/offers/create-a-payment-plan-offer)).
* **Send only if the transaction has value**: Skip sending a receipt for free, trial, or fully discounted transactions.
* **Send refund receipts**: Toggle this on to email customers a receipt when you issue a refund. You can also add a custom message to your refund receipt emails here.
 ### Download options
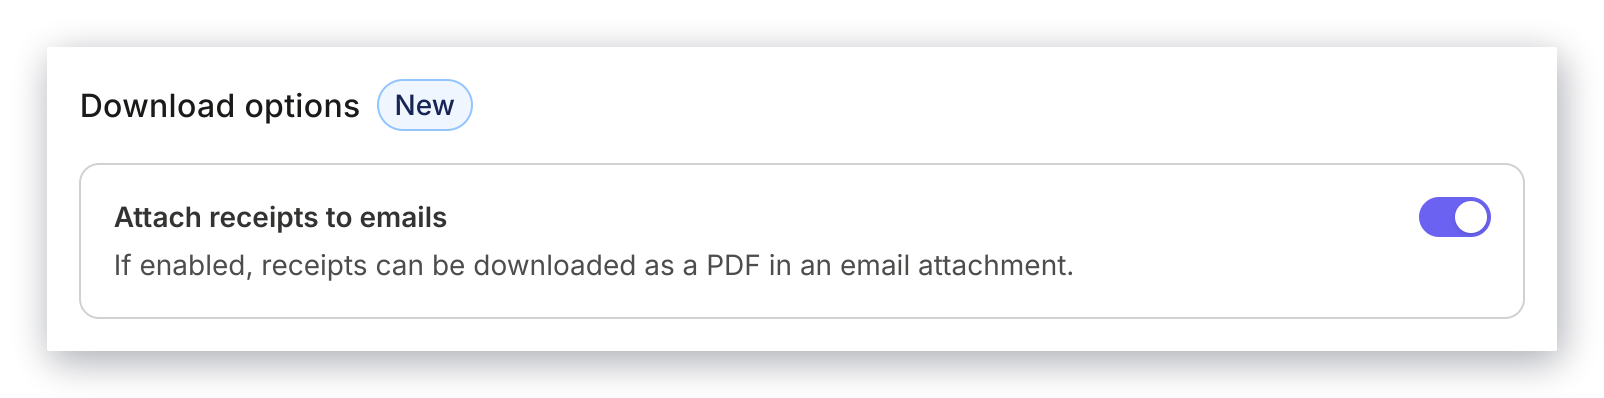
Toggle **Attach receipts to emails** on if you want a PDF version of the receipt attached to your receipt emails. Email receipts must be enabled for PDFs to send successfull
### Download options
Toggle **Attach receipts to emails** on if you want a PDF version of the receipt attached to your receipt emails. Email receipts must be enabled for PDFs to send successfull
 ## Update the logo on your receipts
The logo that appears at the top of your receipts comes from your site's branding logo. To change your receipt title or custom message instead, use the **Customize receipts** settings in **Settings > Customer Payments > Receipts**.
1. From the Dashboard, open the **Settings** tab.
2. Go to **Branding**.
3. Update the **Logo** with the image you want to appear on your receipts.
## Change the language of receipts
The receipt language can be edited by you or your customers.
Receipts will be sent in your site's default language. You and your customers can control the language used in Kajabi receipts.
### Edit receipt language for a customer
1. From the Dashboard, open the **Contacts** tab.
2. Select **All Contacts**.
3. Search for your **Customer**.
4. Click **Open full profile.**
5. Select **Edit Details**.
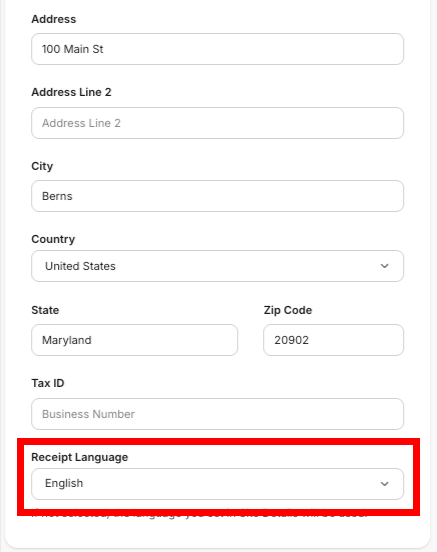
6. Locate **Receipt Language** dropdown and select language preference.
## Update the logo on your receipts
The logo that appears at the top of your receipts comes from your site's branding logo. To change your receipt title or custom message instead, use the **Customize receipts** settings in **Settings > Customer Payments > Receipts**.
1. From the Dashboard, open the **Settings** tab.
2. Go to **Branding**.
3. Update the **Logo** with the image you want to appear on your receipts.
## Change the language of receipts
The receipt language can be edited by you or your customers.
Receipts will be sent in your site's default language. You and your customers can control the language used in Kajabi receipts.
### Edit receipt language for a customer
1. From the Dashboard, open the **Contacts** tab.
2. Select **All Contacts**.
3. Search for your **Customer**.
4. Click **Open full profile.**
5. Select **Edit Details**.
6. Locate **Receipt Language** dropdown and select language preference.
 ### Edit receipt language as a customer
1. **Log in** as a customer of your site.
2. Select **User Menu** from your site's header.
3. Select **Settings**.
4. Under the **Contact & settings** tab, locate the **Receipt Language** dropdown and select the language preference.
**Note:** The receipt language doesn't change your custom **Receipt title**, **Custom message**, **Offer Title**, **Tax number**, business name, business address, or form information your customer submitted — these display exactly as entered. If you haven't set a custom receipt title, Kajabi's default title still appears in the customer's chosen language.
## Edit receipt contact information
1. From the Dashboard, open the **Sales** tab.
2. Open the **Payments** tab, then click **Transactions**.
3. Locate the transaction and open its **more options (…) menu**, then select **View more details**.
4. Under the **Transactions** tab, click the **more options (...) menu** next to the transaction and select **View and send receipt**. This opens the receipt in a new tab.
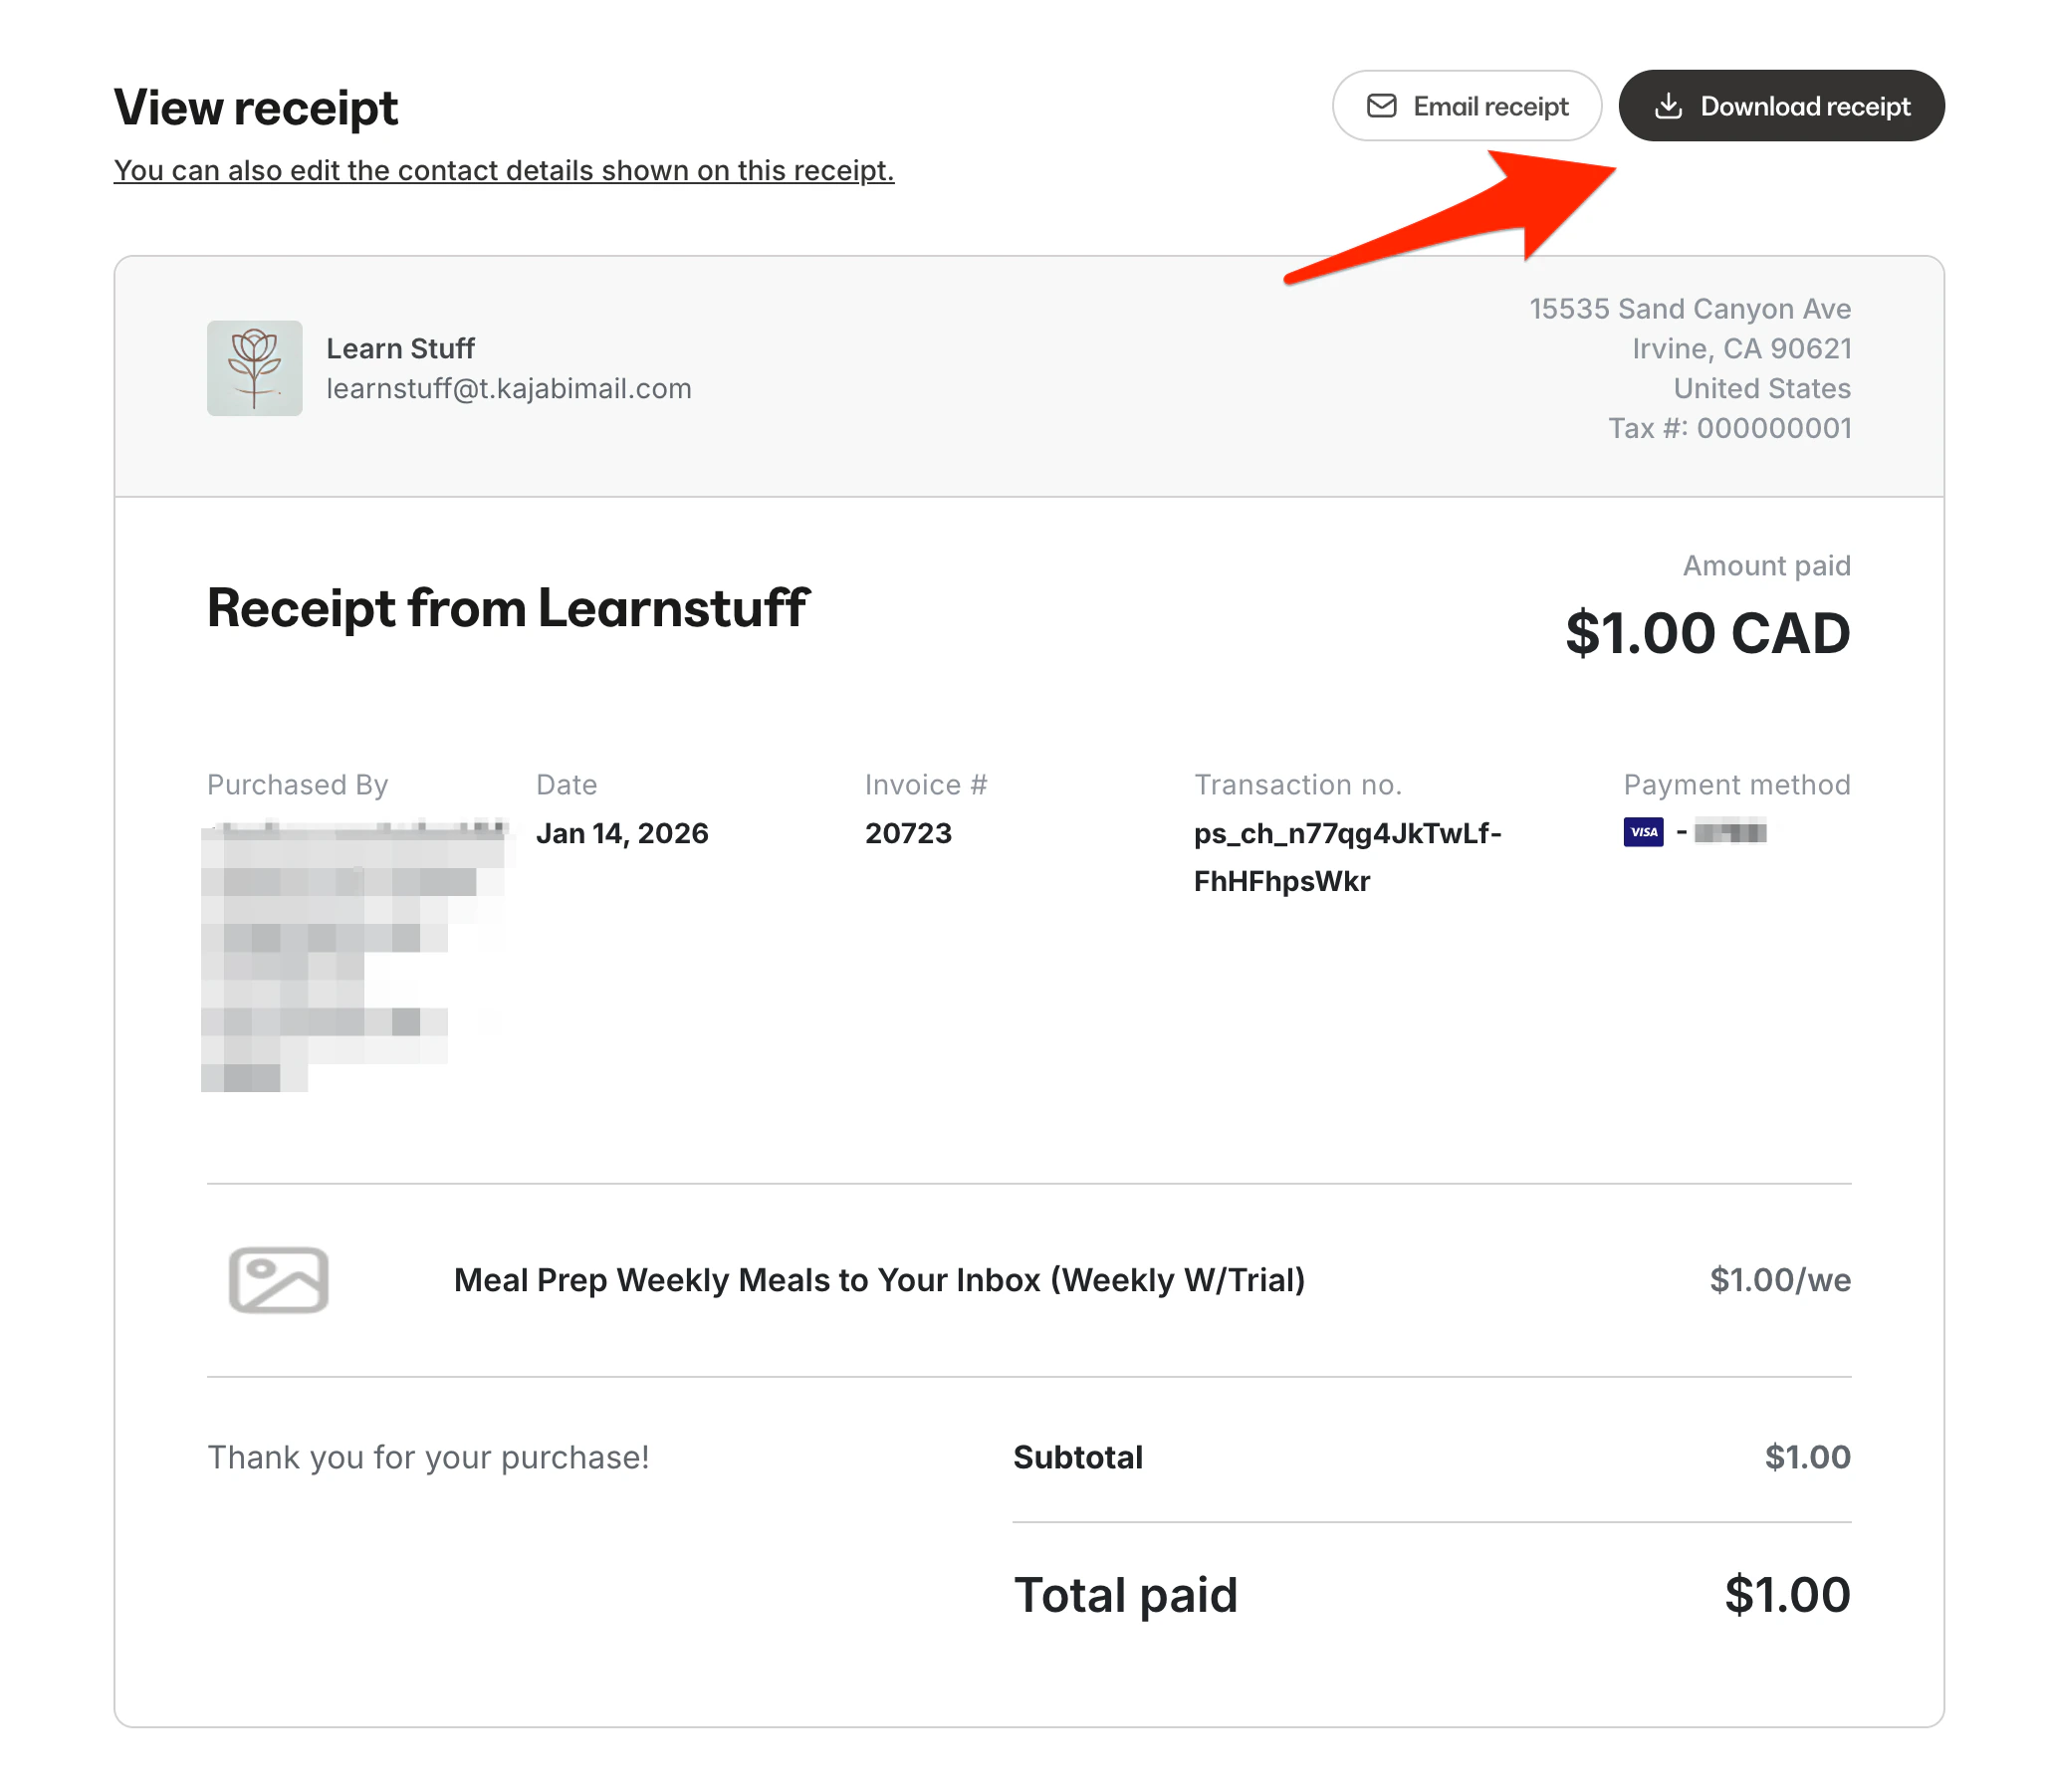
5. On the receipt page, click **You can also edit the contact details shown on this receipt.**
6. Edit the information you wish to edit, then click **Save**.
Once the information is saved, you can choose to send the receipt immediately, or just save the information.
## Test customizations
To ensure your receipt email customizations appear as desired, complete a manual test purchase:
1. [Create a test purchase](/articles/sales/offers/creating-a-test-purchase-in-kajabi).
2. Make a test purchase as an end-user.
3. Check the confirmation email to validate the content and design changes.
## Download receipts as a PDF
You can download a PDF version of any receipt.
### Download a single receipt
1. From the Dashboard, open **Sales > Payments > Transactions**.
2. Search for the transaction via your customer's email and open the **Transaction details** page by clicking on the dollar amount of the transaction.
3. From the **Transaction detail** page, open the **more options (…) menu** and select **View and send receipt**.
4. On the receipt page, click **Download receipt**.
### Edit receipt language as a customer
1. **Log in** as a customer of your site.
2. Select **User Menu** from your site's header.
3. Select **Settings**.
4. Under the **Contact & settings** tab, locate the **Receipt Language** dropdown and select the language preference.
**Note:** The receipt language doesn't change your custom **Receipt title**, **Custom message**, **Offer Title**, **Tax number**, business name, business address, or form information your customer submitted — these display exactly as entered. If you haven't set a custom receipt title, Kajabi's default title still appears in the customer's chosen language.
## Edit receipt contact information
1. From the Dashboard, open the **Sales** tab.
2. Open the **Payments** tab, then click **Transactions**.
3. Locate the transaction and open its **more options (…) menu**, then select **View more details**.
4. Under the **Transactions** tab, click the **more options (...) menu** next to the transaction and select **View and send receipt**. This opens the receipt in a new tab.
5. On the receipt page, click **You can also edit the contact details shown on this receipt.**
6. Edit the information you wish to edit, then click **Save**.
Once the information is saved, you can choose to send the receipt immediately, or just save the information.
## Test customizations
To ensure your receipt email customizations appear as desired, complete a manual test purchase:
1. [Create a test purchase](/articles/sales/offers/creating-a-test-purchase-in-kajabi).
2. Make a test purchase as an end-user.
3. Check the confirmation email to validate the content and design changes.
## Download receipts as a PDF
You can download a PDF version of any receipt.
### Download a single receipt
1. From the Dashboard, open **Sales > Payments > Transactions**.
2. Search for the transaction via your customer's email and open the **Transaction details** page by clicking on the dollar amount of the transaction.
3. From the **Transaction detail** page, open the **more options (…) menu** and select **View and send receipt**.
4. On the receipt page, click **Download receipt**.
 ## Bulk download receipts
Bulk exports are helpful for accounting, audits, and tax prep.
1. From the Dashboard, open **Sales > Transactions**.
2. Click **Export**.
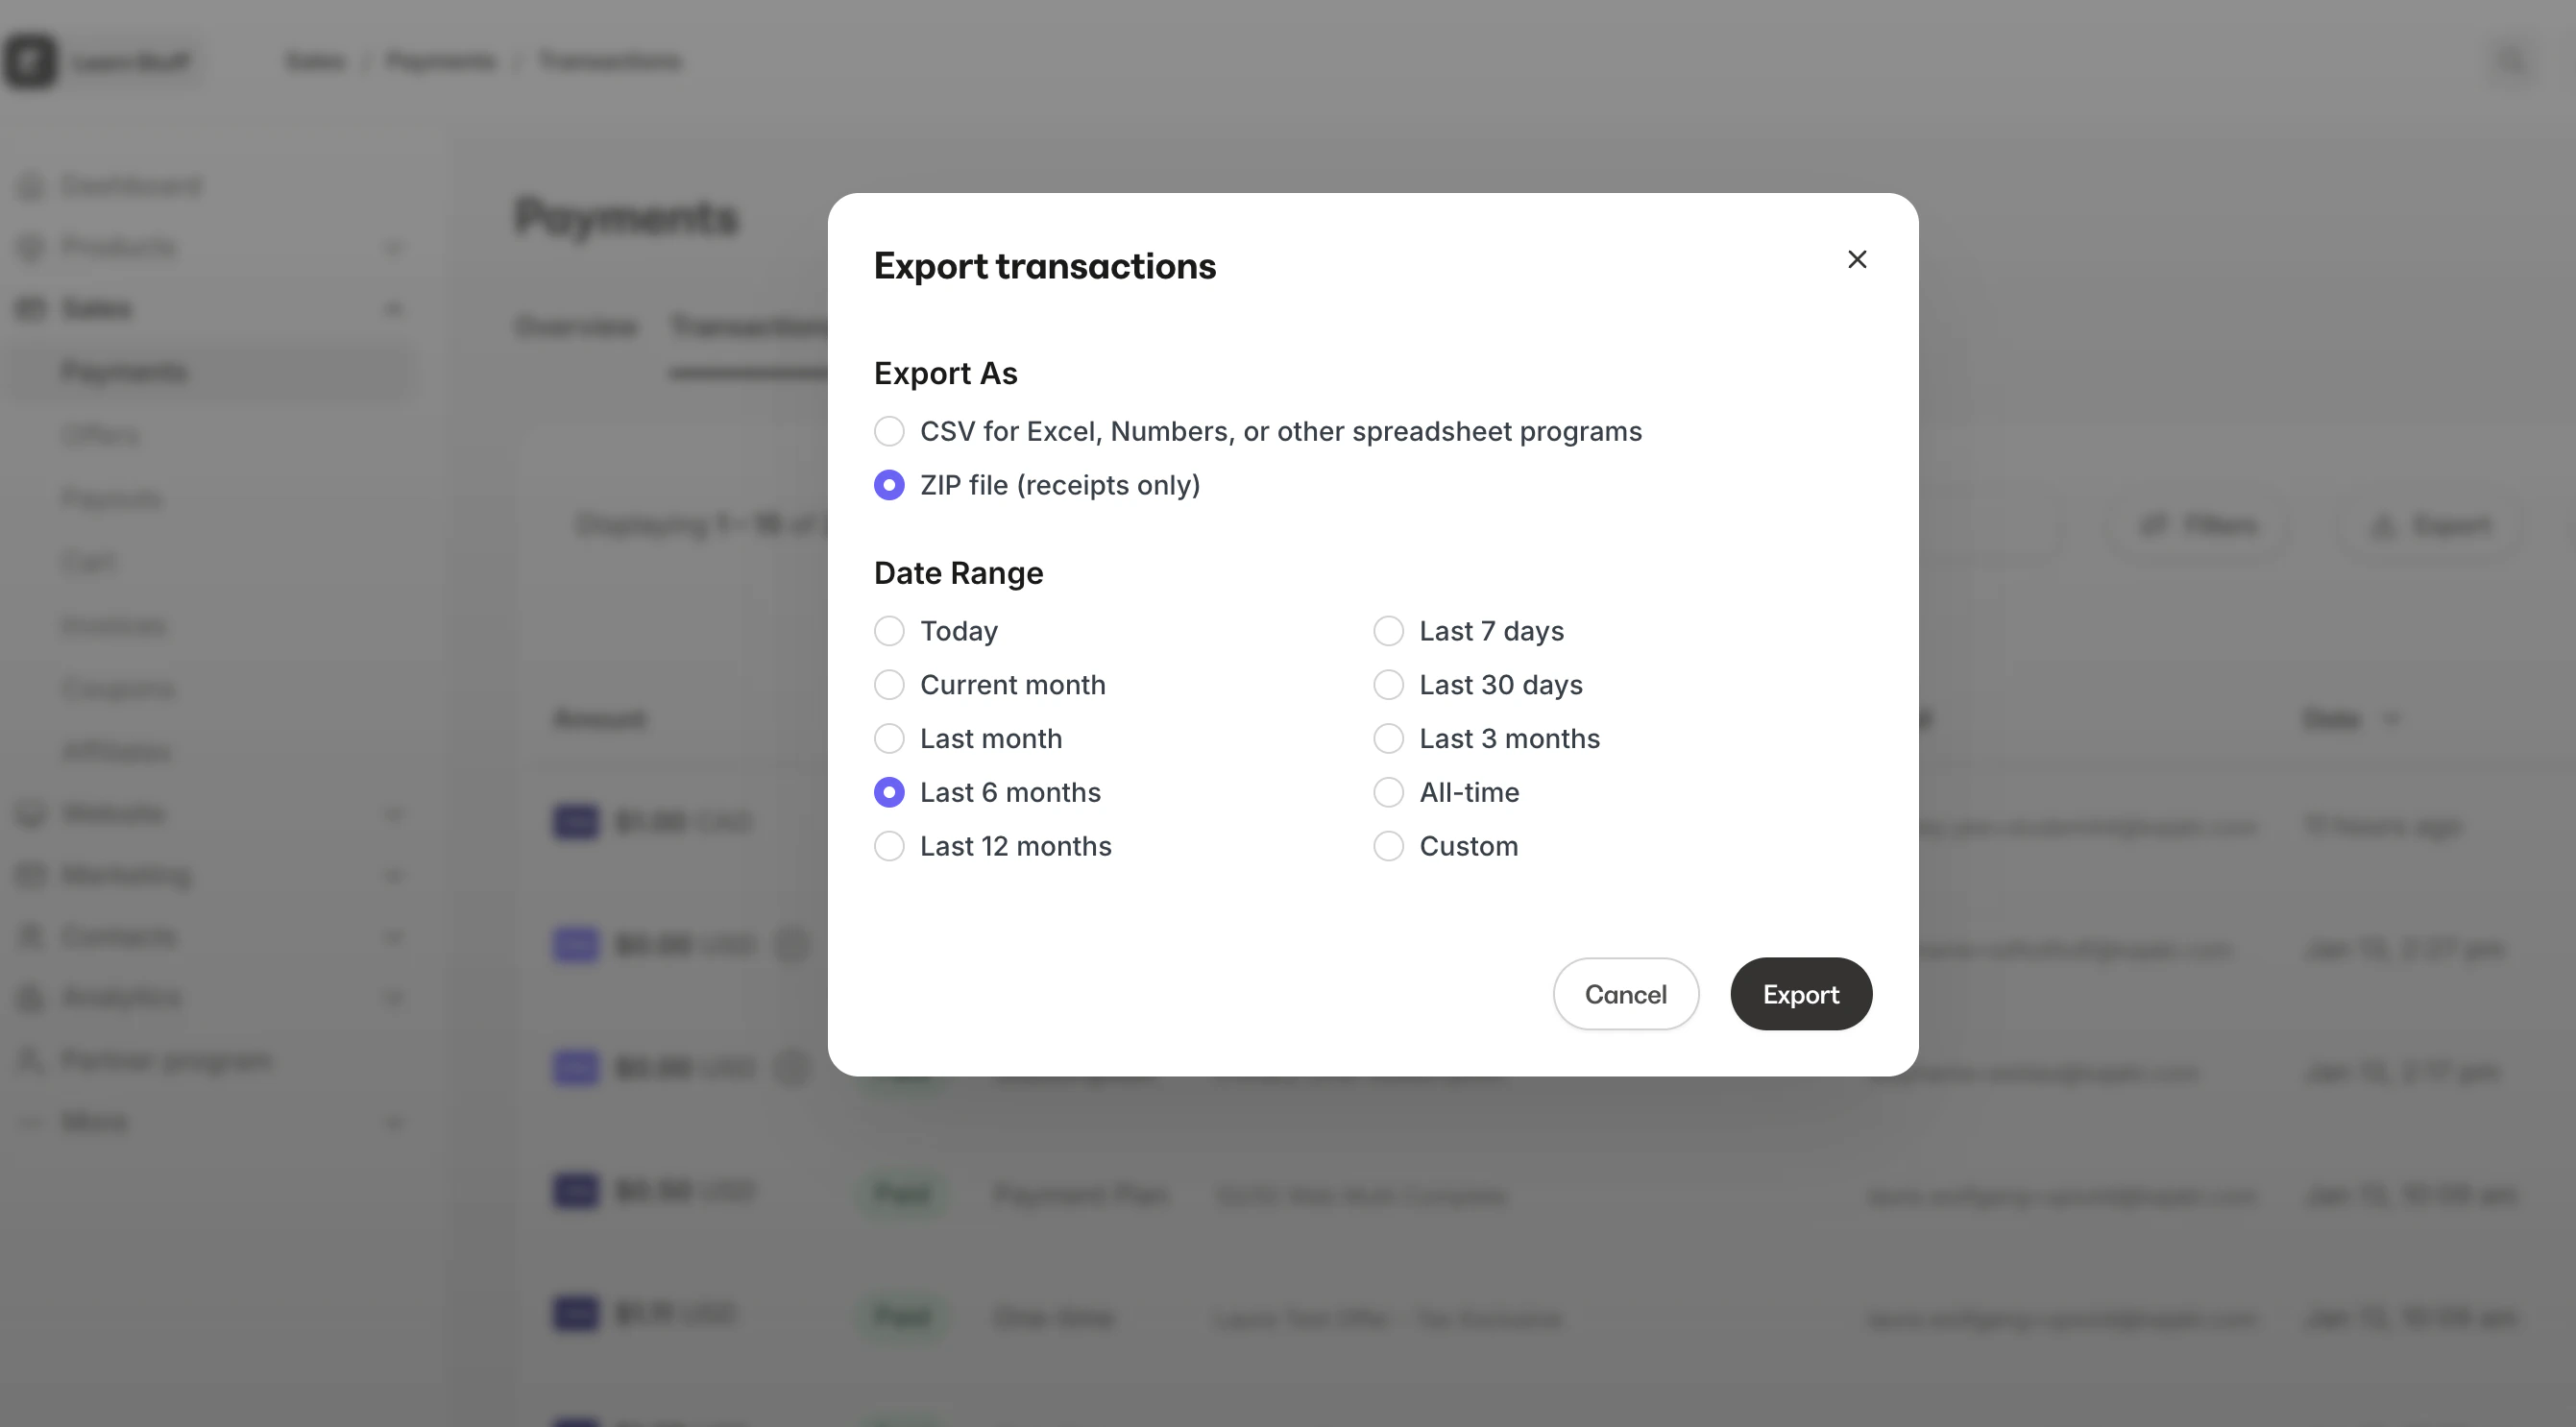
3. Choose a **Date range**, then select **ZIP file (receipts only)** as the export format.
4. Click **Export**.
5. You'll receive an email with the subject: *Your transaction receipts export is ready*.
6. The email will prompt you to log in to your Kajabi account, which will then download your ZIP file once you're logged in.
## Bulk download receipts
Bulk exports are helpful for accounting, audits, and tax prep.
1. From the Dashboard, open **Sales > Transactions**.
2. Click **Export**.
3. Choose a **Date range**, then select **ZIP file (receipts only)** as the export format.
4. Click **Export**.
5. You'll receive an email with the subject: *Your transaction receipts export is ready*.
6. The email will prompt you to log in to your Kajabi account, which will then download your ZIP file once you're logged in.
 **Note:** Download links expire after 7 days.
## Resend email receipts
**Note:** Your customers can view and download their purchase receipts from their **Customer Settings**. [Learn how customers update their account settings](/articles/contacts/manage-your-contacts/customer-update-of-customer-settings).
Resend email receipts after customers have purchased.
Email receipts can be sent from the Transactions page as well as the Contacts page. Resent email receipts only include transaction details for the purchase and exclude additional fees or unrelated charges.
### Resend an email receipt from the Transactions page
1. From the Dashboard, open the **Sales** tab.
2. Select **Payments**.
3. Click **Transactions**.
4. Search the email of the **Customer** you wish to resend the receipt to.
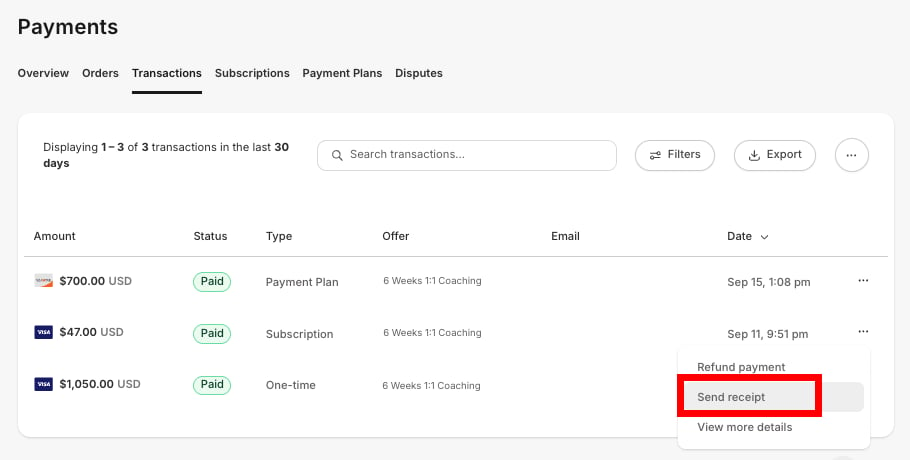
5. Open the **more options (…) menu**.
6. Select **Send receipt**.
**Note:** Download links expire after 7 days.
## Resend email receipts
**Note:** Your customers can view and download their purchase receipts from their **Customer Settings**. [Learn how customers update their account settings](/articles/contacts/manage-your-contacts/customer-update-of-customer-settings).
Resend email receipts after customers have purchased.
Email receipts can be sent from the Transactions page as well as the Contacts page. Resent email receipts only include transaction details for the purchase and exclude additional fees or unrelated charges.
### Resend an email receipt from the Transactions page
1. From the Dashboard, open the **Sales** tab.
2. Select **Payments**.
3. Click **Transactions**.
4. Search the email of the **Customer** you wish to resend the receipt to.
5. Open the **more options (…) menu**.
6. Select **Send receipt**.
 ### Resend an email receipt from Contacts
1. From the Dashboard, open the **Contacts** tab.
2. Select the name of the contact you wish to resend the receipt to, then click **Open full profile**.
3. Select the **Purchases** tab.
4. Locate the Offer that was purchased and click **View Details**.
5. Select the **Transactions** tab.
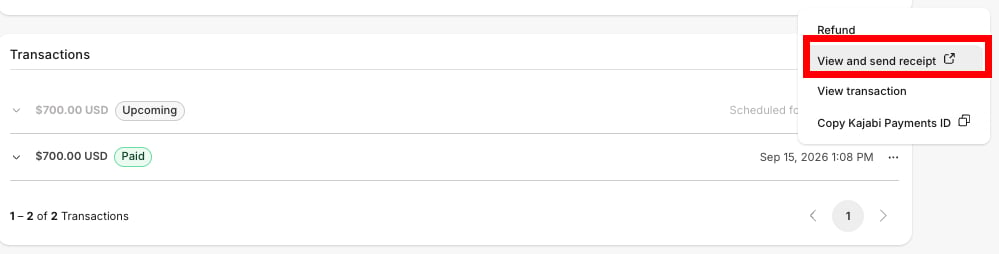
6. Next to the transaction you want to send, open the **more options (…) menu**.
7. Click **View and send receipt**. This opens the receipt in a new tab.
8. On the receipt page, click **Email receipt**.
### Resend an email receipt from Contacts
1. From the Dashboard, open the **Contacts** tab.
2. Select the name of the contact you wish to resend the receipt to, then click **Open full profile**.
3. Select the **Purchases** tab.
4. Locate the Offer that was purchased and click **View Details**.
5. Select the **Transactions** tab.
6. Next to the transaction you want to send, open the **more options (…) menu**.
7. Click **View and send receipt**. This opens the receipt in a new tab.
8. On the receipt page, click **Email receipt**.
 ## Resend refund receipts
**Note:** Remember to activate your **Send refund receipts** setting. [Learn how to refund customers](/articles/contacts/manage-your-contacts/refund-your-customers).
Once refunded, the refund receipt can be resent to your customer.
### Resend a refund receipt from the Transactions page
1. From the Dashboard, open the **Sales** tab.
2. Select **Payments**.
3. Select the **Transactions** tab.
4. Find the payment you wish to send a receipt for and open its **more options (…) menu**.
5. Select **Send refund receipt**.
### Resend a refund receipt from the Contact page
1. From the Dashboard, open the **Contacts** tab.
2. Select the name of the contact you wish to resend the receipt to, then click **Open full profile**.
3. Select the **Purchases** tab.
4. Locate the Offer that was purchased and click **View Details**.
5. Select the **Transactions** tab.
6. Next to the transaction you want to send, open the **more options (…) menu**.
7. Click **View and send refund receipt**. This opens the receipt in a new tab.
8. On the receipt page, click **Email receipt**.
## FAQs
### Why doesn't updating my Marketing Settings address change my receipts?
Your Marketing Settings address is only copied from your Kajabi billing address one time, when your site is first created. After that, the two are independent, so editing Marketing Settings never updates your receipts. To change the address customers see on receipts, edit it in **Settings > Customer Payments > Receipts**, or update your [billing address](/articles/account-settings/billing/how-to-update-billing-details) if you want the default to change too.
### Can I use Kajabi Receipts alongside Stripe or PayPal?
Yes, but only use one at a time. If you turn on Kajabi Receipts while collecting payments through Stripe or PayPal, disable [receipts in Stripe](/articles/api-integrations/payment-integrations/how-to-send-a-receipt-in-stripe) or [PayPal](/articles/api-integrations/payment-integrations/how-do-i-send-a-receipt-with-paypal) first so customers don't get duplicate receipts.
### Can I decrease my next invoice number?
No. You can only increase the **Next invoice number**. Kajabi returns an error if you try to lower it, since invoice numbers must stay sequential going forward.
## Resend refund receipts
**Note:** Remember to activate your **Send refund receipts** setting. [Learn how to refund customers](/articles/contacts/manage-your-contacts/refund-your-customers).
Once refunded, the refund receipt can be resent to your customer.
### Resend a refund receipt from the Transactions page
1. From the Dashboard, open the **Sales** tab.
2. Select **Payments**.
3. Select the **Transactions** tab.
4. Find the payment you wish to send a receipt for and open its **more options (…) menu**.
5. Select **Send refund receipt**.
### Resend a refund receipt from the Contact page
1. From the Dashboard, open the **Contacts** tab.
2. Select the name of the contact you wish to resend the receipt to, then click **Open full profile**.
3. Select the **Purchases** tab.
4. Locate the Offer that was purchased and click **View Details**.
5. Select the **Transactions** tab.
6. Next to the transaction you want to send, open the **more options (…) menu**.
7. Click **View and send refund receipt**. This opens the receipt in a new tab.
8. On the receipt page, click **Email receipt**.
## FAQs
### Why doesn't updating my Marketing Settings address change my receipts?
Your Marketing Settings address is only copied from your Kajabi billing address one time, when your site is first created. After that, the two are independent, so editing Marketing Settings never updates your receipts. To change the address customers see on receipts, edit it in **Settings > Customer Payments > Receipts**, or update your [billing address](/articles/account-settings/billing/how-to-update-billing-details) if you want the default to change too.
### Can I use Kajabi Receipts alongside Stripe or PayPal?
Yes, but only use one at a time. If you turn on Kajabi Receipts while collecting payments through Stripe or PayPal, disable [receipts in Stripe](/articles/api-integrations/payment-integrations/how-to-send-a-receipt-in-stripe) or [PayPal](/articles/api-integrations/payment-integrations/how-do-i-send-a-receipt-with-paypal) first so customers don't get duplicate receipts.
### Can I decrease my next invoice number?
No. You can only increase the **Next invoice number**. Kajabi returns an error if you try to lower it, since invoice numbers must stay sequential going forward.